
DIY USB Cable Extension
What to do with the old phone charger cables? Instead of throwing them away, turn them into useful USB extension cables! This simple DIY project helps reduce e-waste and saves you money.
Amazon links
As an Amazon Associate I earn from qualifying purchases:
- usb c charger
- usb c charger cable
- usb hub 3.0
- usb c hub
- usb c hub multiport adapter
- Ethernet adapter USB-C
- USB-C Hub with Ethernet
- Wifi Extender / Booster
- Wi-Fi Router
What You Need
- An old phone charging cable (iPhone or Android)
- USB Type A Female connector
- Soldering iron and solder
- Hot glue gun and glue sticks
- Wire strippers
- Heat shrink tubing (optional but recommended)
USB Wiring
A standard USB 2.0 cable has four wires:
- Red: VCC (+5V power)
- Black: Ground (GND)
- White: Data- (D-)
- Green: Data+ (D+)
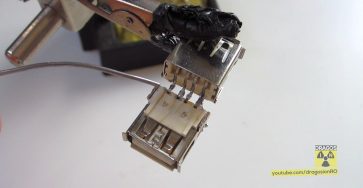
Wiring Note
When connecting the cables, remember they face each other, meaning one side will be upside-down. This ensures:
- Ground connects to Ground
- Power connects to Power
- Data+ connects to Data+
- Data- connects to Data-
Step-by-Step Guide
- Prepare Your Old Cable:
- Cut off the damaged end
- Strip back the outer insulation (about 1 inch)
- Strip a small amount from each inner wire
- Identify each wire color and its purpose
- Prepare the Female Connector:
- If it comes with leads, great!
- If not, you’ll need to solder directly to the pins
- Check the pin layout diagram that came with your connector
- Making the Connections:
- Match the wires following the USB standard
- Twist matching wires together
- Solder each connection one at a time
- Use heat shrink tubing on each joint
- Final Assembly:
- Test the connections before sealing
- Add hot glue inside the connector housing
- Press the parts together
- Add more hot glue around the cable entry point
Testing
Before using your new extension:
- Check for shorts with a multimeter if you have one
- Try connecting a simple USB device like a mouse
- If it works, test with other devices
- Monitor for any heating during use
Safety
Remember these:
- Double-check your wire connections
- Ensure no bare wires are touching
- Use enough hot glue to secure everything
- If something feels wrong, check again
Common Mistakes
Watch out for these issues:
- Mixing up the data wires
- Forgetting to insulate connections
- Not using enough hot glue
- Rushing the soldering process
When to Stop
Sometimes a cable just isn’t worth saving:
- If the wires inside are damaged
- If the cable is very old or brittle
- If you’re not confident about the connections
- If it feels unsafe during testing
Conclusions
This DIY project is a great way to:
- Save money on new cables
- Reduce electronic waste
- Learn basic electronics skills
- Make custom-length extensions
Remember, this project isn’t difficult but it requires attention to detail and basic soldering skills. Take your time, double-check your connections, and enjoy your new homemade USB extension cable!


Leave a Reply