Author: Dragos Ion

  • Recertified Refurbished White Label Drives Seagate Exos X22 22TB OS HDD

    Recertified Refurbished White Label Drives Seagate Exos X22 22TB OS HDD

    Recertified Refurbished White Label Drives Seagate Exos X22 22TB OS OOS HDD

    Unboxing Recertified Whitelabel OOS or OS Seagate Exos X22 22TB HDD 2 pieces bought from datablocks.dev in Netherlands.

    I paid full price and shipping – not a sponsored video.

    Unboxing

    Recertified Refurbished White Label Drives Seagate Exos X22 22TB OS OOS HDD Unboxing

    Installation

    Recertified Refurbished White Label Drives Seagate Exos X22 22TB OS HDD Installation and Tests

    Speed tests S.M.A.R.T. information

    Recertified Refurbished White Label Drives Seagate Exos X22 22TB OS HDD Speed Test

    Extended full disk surface write tests

    Recertified Refurbished White Label Drives Seagate Exos X22 22TB OS HDD Full Write Test

    Swap old and new drive letters in Windows 11

    Recertified Refurbished White Label Drives Seagate Exos X22 22TB OS HDD Speed Test

    Starting with the negatives

    The seller had the shipping address a bit different than what I send.

    Placed the street number too far away from the street name but got in contact and he was very helpful and changed it. But if I didn’t notice, it would probably be lost or delayed.

    The drives have some big dents on them.

    The positives

    The drives work after full write+read verify test. The drives are silent and keep cool with proper ventilation.

    The shipping was very fast compared to the usual here.The Shipping box was very well packed with fragile warning labels outside and lots of bubble wrap inside.

    The seller doesn’t know anything about this video being made.In the series with these drives I will review the risks of buying OS or OOS Out Of Spec Drives HDD refurbished to recycle and reuse.

    These drives were probably used in a datacenter or were defective, returned to Seagate and rebuilt or just inspected.Sealed and recertified but this OS or OOS type of drive is not good enough to put the branding Seagate Exos on it even as recertified and that’s a bit worrying.

    Amazon* affiliate links

    External Hard Drive https://rex.red/external-hard-drive 
    14 TB HDD https://rex.red/external-hard-drive-14tb 
    18 TB https://rex.red/external-hard-drive-18tb 
    20 TB HDD https://rex.red/external-hard-drive-20tb 
    22 TB HDD https://rex.red/external-hard-drive-22tb 
    SSD https://rex.red/external-ssd 
    M.2 NVMe Storage NVMe m.2 SSD PCIe 3.0 https://rex.red/NVMe-m.2-SSD-PCIe-3.0 
    NVMe m.2 SSD PCIe 4.0 https://rex.red/NVMe-m.2-SSD-PCIe-4.0 
    Flash drive https://rex.red/usb-flash-drive

    Installed and tested thoughly

    After unboxing I installed the drives in my PC and compared the noise with the exising WD 5400 RPM Helium filled drive.

    Was thinking that the Whitelabel Refurbished Exos X22 22TB might have more vibrations or noise just from being a 7200RPM spinning rust drive.

    They not noisy! Both really quiet and only when seeking they make a louder head seek noise but nothing annoying in a PC.

    Doing speed tests with Crystal Disk Mark shows great speed or approximately 280MB/S write speed which is expected as a 7200 RPM HDD should be like that especially when empty.Did Self test with Sea Tools and all ok.

    Was going to do the extended test with Sea Tools but decided to use the H2testw tool I usually use that will write the while drive full then read the files to verify.It takes 20-24 hours to write but can be done at the same time on both.Then another 20 hours to verify.

    Temperature is pretty stable as seen in the test video at around 48 Celsius. One of the drive is in a HDD cage and not well ventilated so it reaching 50 degrees Celsius.The serial number and model number don’t match Seagate Exos X22 22TB but I believe this is normal as Seagate is removing any references to it’s brand from these white label hard disks.I don’t know how bad these OS or OOS drives can be but for now they work perfectly.There is no warranty from Seagate for these drives.

    Only a 1 year warranty from the seller / shop so there are risks taken with these.The price I bought them at is 279 EURO each + shipping.279 / 22 TB is 12.68 EUR per TB of storage.It would have been a much better deal at 11 EUR / Terabyte but these are high density and 20TB drives tend to be cheaper.Still a great deal unless they fail after 12 months.

    The usable storage is actually 20TB.What’s a bit worrying is the Read Error Rate S.M.A.R.T. attribute going up and down but still not showing any Windows 11 Drive failure errors and it’s above the threshold value so maybe it’s a Seagate thing.

    Usually I buy WD drives but took the bait for these cheaper manufacturer refurbished or recertified drives.They won’t be used a lot but mostly storing data. Still have to do a burn-in stress test to make sure it’s not a DOA situation.

    So far everything seems ok but will update after a while of use.

    h2testwErrors at the last file written on the drives

    Probably it’s a bug in the testing tool hopefully.Verification takes another 20+ hours

    O:Media has filled up earlier than expected!In the beginning there were 20981318 MByte free, but only20981293 MByte could be written.Warning: Only 20981318 of 20981741 MByte tested.Writing speed: 205 MByte/sH2testw v1.4

    R:Media has filled up earlier than expected!In the beginning there were 20979780 MByte free, but only20979755 MByte could be written.Warning: Only 20979780 of 20981741 MByte tested.Writing speed: 202 MByte/sH2testw v1.4

    After tests finished got the results, all OK!

    O:Warning: Only 20981293 of 20981741 MByte tested.Test finished without errors.Reading speed: 116 MByte/sH2testw v1.4

    R:Warning: Only 20979755 of 20981741 MByte tested.Test finished without errors.Reading speed: 115 MByte/sH2testw v1.4

    Drive specifications from Crystal Disk Info

    (05) OOS22000G
    O:
    Model : OOS22000G
    Firmware : OOS1
    Serial Number : 00003J2X
    Disk Size : 22000.9 GB (8.4/137.4/22000.9/22000.9)
    Buffer Size : Unknown
    Queue Depth : 32
    # of Sectors : 42970644480
    Rotation Rate : 7200 RPM
    Interface : Serial ATA
    Major Version : ACS-4
    Minor Version : ----
    Transfer Mode : SATA/600 | SATA/600
    Power On Hours : 28 hours
    Power On Count : 8 count
    Temperature : 47 C (116 F)
    Health Status : Good
    Features : S.M.A.R.T., NCQ, Streaming, GPL
    APM Level : ----
    AAM Level : ----
    Drive Letter : O:

    (06) OOS22000G
    R:
    Model : OOS22000G
    Firmware : OOS1
    Serial Number : 00004ANV
    Disk Size : 22000.9 GB (8.4/137.4/22000.9/22000.9)
    Buffer Size : Unknown
    Queue Depth : 32
    # of Sectors : 42970644480
    Rotation Rate : 7200 RPM
    Interface : Serial ATA
    Major Version : ACS-4
    Minor Version : ----
    Transfer Mode : SATA/600 | SATA/600
    Power On Hours : 28 hours
    Power On Count : 7 count
    Temperature : 49 C (120 F)
    Health Status : Good
    Features : S.M.A.R.T., NCQ, Streaming, GPL
    APM Level : ----
    AAM Level : ----
    Drive Letter : R:

    So far after doing the write and read tests the drives are ok and the read error rate is usually above 80 so that looks ok to me.The drive that is cooler usually get a lot warmer when the GPU is working and producing more heat.

    I have a PC cooler fan nearby but seems like it’s not enough so I will try to move both drives in the drive cage and put a cooling fan to blow directly on the drive as close as possible.That should keep them happy.

    At some point the drive next to the gpu was at 55 degrees Celsius while the GPU was working hard so I had to cancel the GPU tasks until the hard drives finish the Write/Read tests.

    Info taken from the seller

    This leading Seagate Exos X22 22TB SATA hard drive with model number ST22000NM001E offers high-capacity storage, is highly reliable with an MTBF rating of 2.5 million hours, and delivers high performance. Ideal for use in a computer, server, or NAS.

    Explanation White Label Hard DrivesA White Label hard drive is a disk that has been returned to Seagate, for example by a hyperscaler (e.g., HP Enterprise), and typically has zero operating hours and is 100% error-free.

    White Label drives can contain scratches or small dents. Seagate White Label hard drives undergo thorough checks at the Seagate factory, come without Seagate branding, and are sealed. Model: ST22000NM001E
    Exos X22 Enterprise
    Capacity: 22 TB
    SATA White Label Seagate.
  • VW Polo 9N Rear Brakes Replacement

    VW Polo 9N Rear Brakes Replacement

    VW Polo 9N Rear Brakes Replacement

    How to replace rear brakes on VW Polo 9N.

    Rear Brake Shoes and Brake Drums Replacement Without Special Tools.

    VW Polo 9N Rear Brakes Replacement

    Bonus gravity brake lines bleeding and brake fluid flush without pressing the brake pedal and without any special tools.

    The hardest parts are getting the old rear brake shoes out without removing the wheel hub and bearing and without removing the reak brakes cylinder.

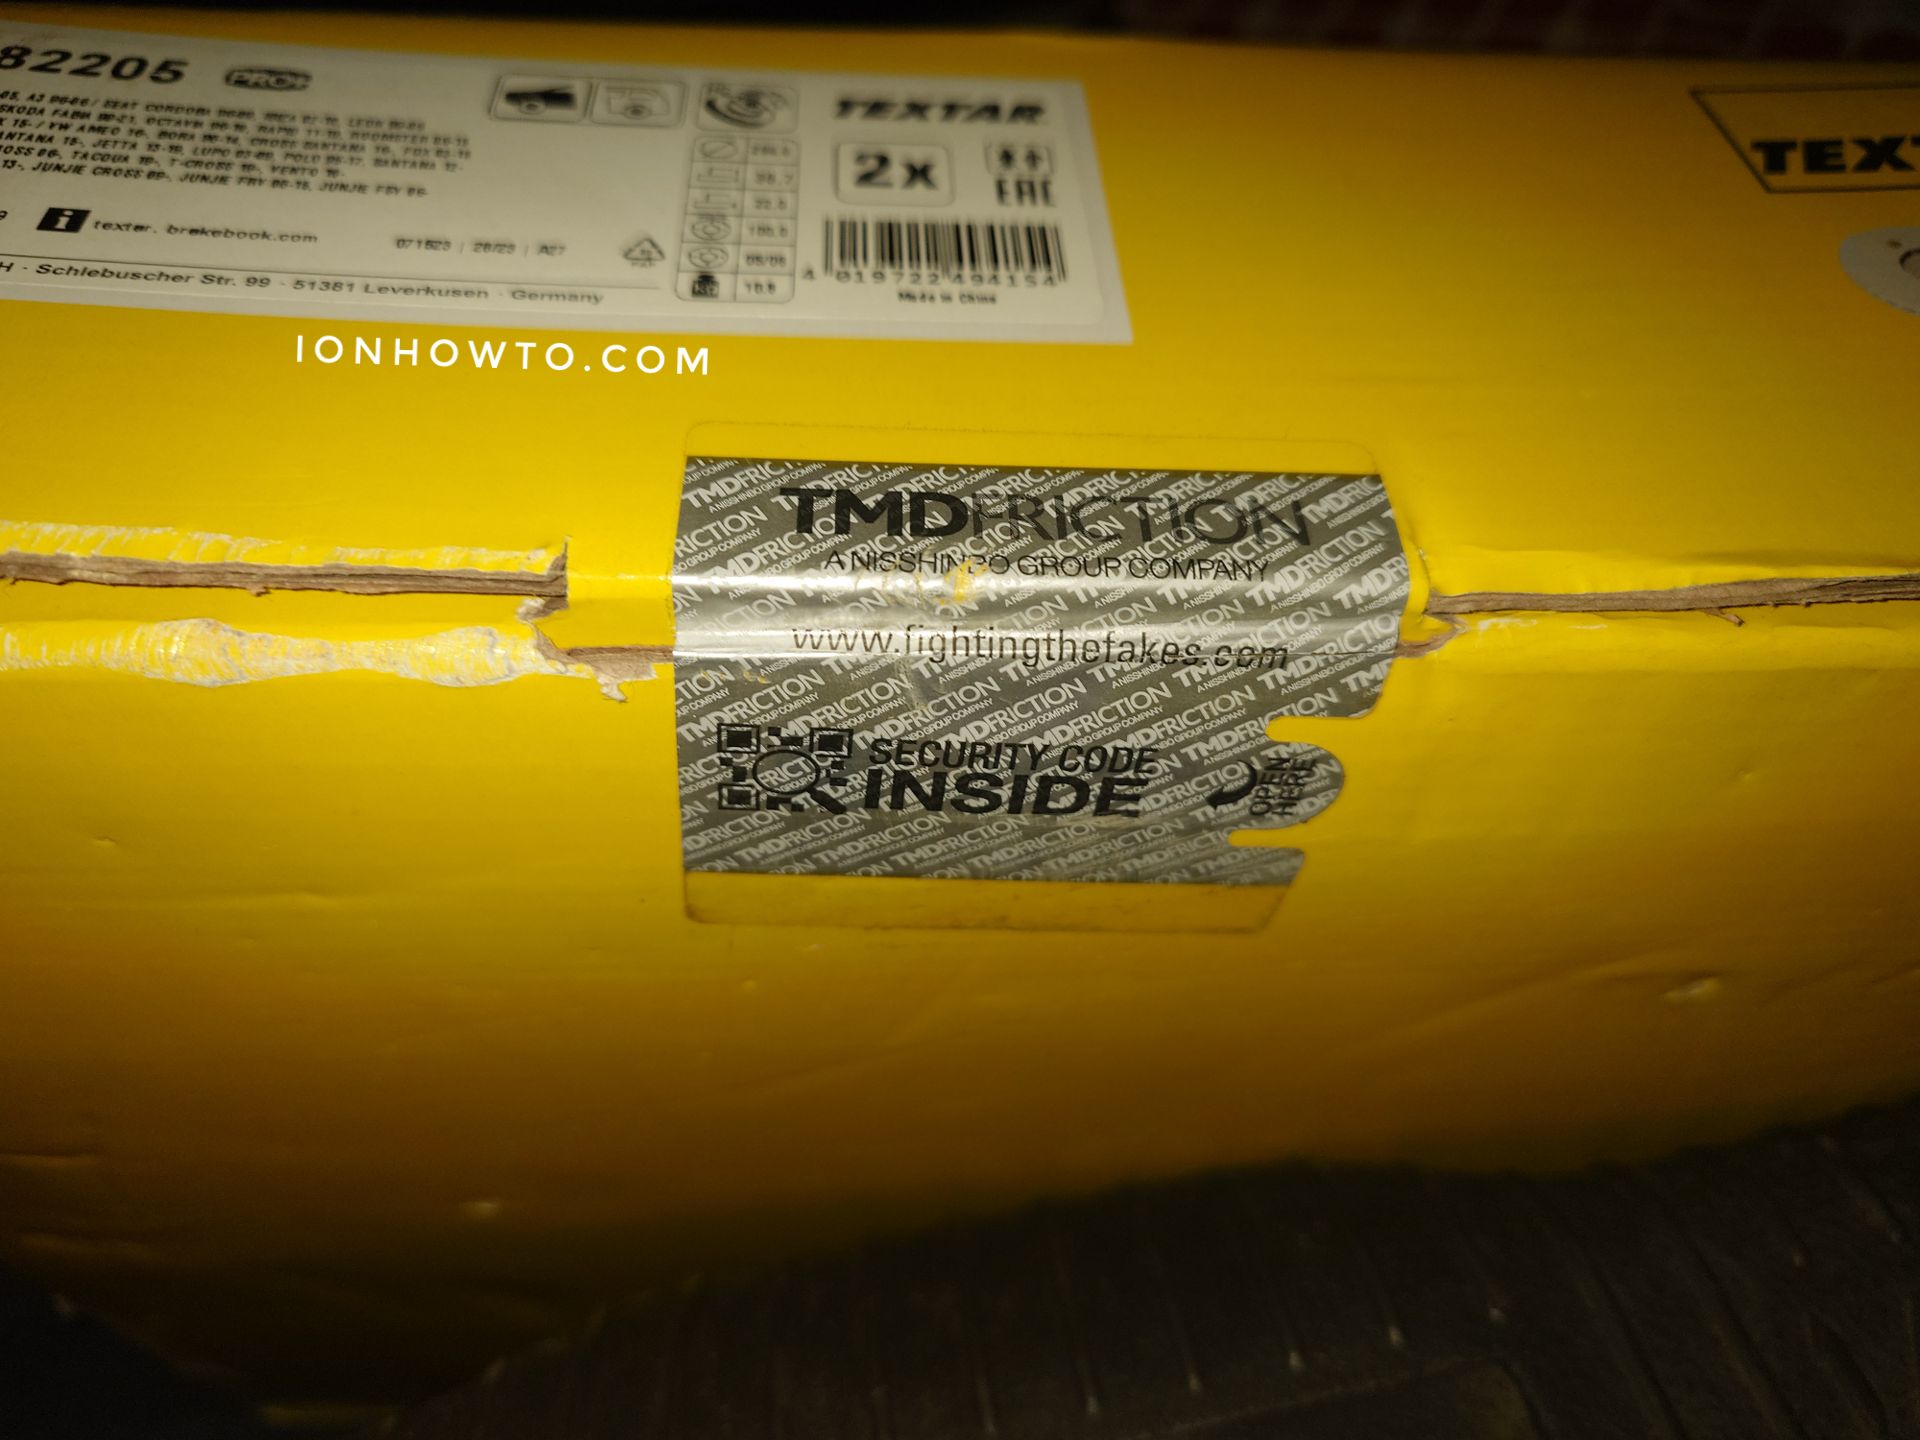
    Textar brand brake shoes replacement parts 

    Product code Textar 

    Made by TMD Friction Services GmbH. Germany 

    Febi Rear Brake Drums 

    Before lifting rear of the car on stands, open the trim cover of the handbrake and access the handbrake adjuster but.

    Use a 10mm ratchet key to untighten the handbrake cables as far as it can go without removing the nut completely!

    Put stoppers on the front wheels behind and in front of the wheels.

    With the engine off, put the car in first gear to keep it more steady.

    Release the handbrake all the way down and make sure the handbrake cables are loose.

    Lift the car safely on a jack and use standa for both sides of the car so that both rear wheels are 

    To remove the rear brake drums spray WD-40 on the Philips screw and let it sit for 10-15 minutes.

    Do that as soon as you remove the wheel. Best is to remove both wheels and spray the philips screw that holds the brake drumps as soon as you start.

    While you wait before removing the brake drums and brake pads, the wd-40 works it’s magic.

    Take a decent sized hammer and hit it like you see in the video also use a flat screwdriver to pull the brake drums while hitting the brake drums with the hammer as seen in the video.

    If the wheel hub and the brake drum are not spinning, the brake shoes might be locked and you can unlock the brakes by pressing on the wedge as shown in the video.

    Clean the wheel hub with light sandpaper or a wire brush if there’s rust.

    Use wd-40 and brake cleaner to make the wheel hub surface super clean and free of rust.

    Feel the surface with your fingers to Ensure no texture is present from any rusty spots.

    Grease as in the video using Copper Grease Antiseize so the brake drums are easier to remove next time and don’t grease the big wheel nuts screws.

    Changed the rear brakes on the car and I felt exhausted.

    It’s much easier to change brake pads and it’s really hard to change brake shoes mostly because of the springs tension and mirror orientation on the right brakes vs left brakes.

    I suggest you take pictures or better video of how the brakes are assembled before you remove them and during every step to have a reference to go back to.

    I tried to record everything as close and detailed as possible but at some point with the big top springs it was too hard to do both recoring and actually doing it well.

    The rear brakes have the handbrake too so watch that part carefully as there is a way to pull the brake leaver closer and hold the handbrake cable at an angle to remove the handbrake steel cable and to reinstall it.

    After reassebly tighten the handbrake aduster nut and pull up the handbrake to confirm the wheels lock on both sides before you lower the car on the ground.

    The Rear Brakes Extended VW Polo 9N Step by step full details video will be members only.

    If you didn’t have a reason to join this channel yet, the video is close, detailed and full of useful information that’s not in even 1 video on the internet now.

    All the forum posts and videos I read and watch didn’t prepare me for the tricky parts of the front brakes and especially for the rear brakes.

    This video will prepare you so that you can do the rear brakes replacement without a problem.

    Enjoy the video and thanks for the members of this channel!

    Any questions, please do ask and I will answer asap!

    Any questions? 

    Feel free to ask in the comments section bellow.

    Subscribe, Like and SHARE this video with your friends!

  • VW Polo 9N Brake Pads and Brake Rotors Change Without Special Tools

    VW Polo 9N Brake Pads and Brake Rotors Change Without Special Tools

    Textar brand brake pads for VW Polo 9N
    Product code Textar 2313001
    Made by TMD Friction Services GmbH. Germany
    Made in Romania

    Textar brand Brake discs / brake rotors for VW Polo 9N
    Series Textar Pro+
    Product code Textar 92082205
    Made by TMD Friction Services GmbH. Germany
    Made in China

    VW Polo 9N Textar Brake Pads and Textar Brake Discs Rotors

    VW Polo 9N Brake Pads and Brake Rotors Change Without Special Tools step-by-step video instructions and highlights of what parts are harder or trickier.

    VW Polo 9N Brake Pads and Brake Rotors Replacement

    Bonus gravity brake lines bleeding and brake fluid flush without pressing the brake pedal and without any special tools.

    VW Polo 9N Brake Pads and Brake Rotors Change Without Special Tools Step-by-step

    I decided to use Textar brake rotors and Textar brake pads as they seem from what I read online that Textar is supposed to be the same quality as OEM BMW brake pads and rotors.
    If it’s good enough for BMW, It’s going to be more than enough for me and my VW Polo 9N.
    I paid for all the parts and this is not a sponsored post or video.

    The hardest parts are getting the old brake diwc rotors off the wheel hubs. I recorded that part very closely but it got lost in the files tranfer.

    To remove the brake disc rotors:Spray WD-40 on rhe Philips screw but also around the holes from the front top, everywhere like you see in the second part of the video.

    Do that as soon as you remove the wheel.While you remove the brake caliper and brake pads, the wd-40 works it’s magic.

    Then take a decent hammer and hit it like you see in the video but harder. there I was just starting before the next video was lost.

    Hit 2 times on left then 2 times on right.Repeat until the rotor just starts moving or falls on the hub or on the ground.

    Do not have your feet or hands under the rotor. let it fall or when it’s moving, it’s easy to pull with your hands.

    Clean the wheel hub with light sandpaper or a wire brush if there’s rust.Use wd-40 then brake cleaner to make the wheel hub surface super clean.

    Feel the surface with your fingers to ensure no texture is present from any rusty spots.Grease as in the video using Copper Grease Antiseize so the rotor is easier to remove next time.

    Changed the brake pads and brake rotors on the car – exhausted but I did it, recorded it and somehow half of the videos 100GB got corrupted while transferring to the SSD.Good thing the other 100GB of video was ok and I was able to recover parts of the corrupted files just enough to make a video for you!

    This VW Polo 9N Step by step full details video will be members only.If you didn’t have a reason to join this channel yet, the video is close, detailed and full of useful information that’s not in even 1 video on the internet now.

    All the forum posts and videos I read and watch didn’t prepare me for the tricky parts.

    This video will prepare you so that you can do the brake pads and discs change without a problem.

    Enjoy the video and thanks for being a member of this channel!Any questions, please do ask in the video comments section and I will answer asap!

  • Screenshot Whole Page in Chrome and Firefox

    Screenshot Whole Page in Chrome and Firefox

    Screenshot Whole Page Including Scroll in Chrome and Firefox.

    All this without any third-party extensions.

    All commands are using built-in features of the most popular web browsers today, Mozilla Firefox and Google Chrome.

    Quick Commands

    Screenshot Whole Page quick steps guide: 

    Chrome Desktop 

    • F12 or Ctrl. + Shift + i 
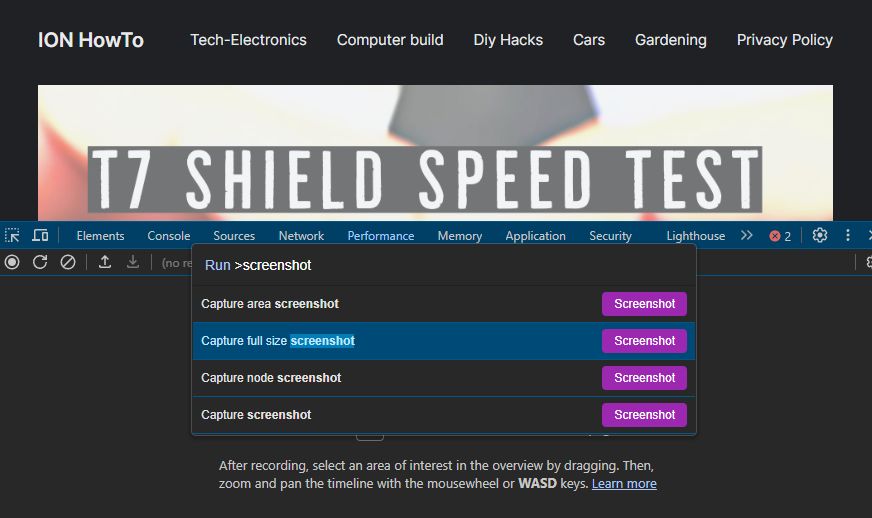
    • Ctrl. Shift + p
    • Type screenshot
    • Click capture full size screenshot

    Chrome Mobile

    • Tap the 3-dotted 
    • Share 
    • Long screenshot
    • Save

    Firefox Desktop

    • Right click anywhere on the page
    • Take Screenshot 
    • Save full page
    • Download or Copy

    Firefox Mobile

    • Tap the 3 dots menu
    • Tap print
    • Save as PDF includes all the whole page with scrolling

    Firefox Mobile on Android

    Open the page you want to save and tap on the top-right 3 dots menu then tap Print.

    Mozilla Firefox Mobile Screenshot Whole Website Scroll Save as PDF
    Mozilla Firefox Mobile Screenshot Whole Website Scroll Save as PDF

    On the Print preview, choose: Save as PDF and choose the paper size you want, Letter or A4 are the most common paper sizes.

    Save the PDF and you will see the PDF document includes all the page with current view and out of view element from scrolling to print-screen.

    Firefox Desktop

    Right click on the page then click on take a screenshot.

    Mozilla Firefox Save Full Page Screenshot Menu
    Mozilla Firefox Save Full Page Screenshot Menu

    The screenshot overlays will appear and you can choose Save visible or Save full page.

    Mozilla Firefox Save Full Page Screenshot
    Mozilla Firefox Save Full Page Screenshot

    Click Save full page and you get a preview of the whole page screenshot including scrolling out of view areas. There you can copy the image to clipboard or download the whole screenshot image as a PNG file. 

    Easy peasy.

    Chrome on Android 14

    For Chrome on Android 14 you can either screenshot or save as PDF.

    Long Screenshot on Chrome Android 14

    Chrome mobile on Android 14 is by far the easiest method to take a screenshot of a whole place including scroll.

    Open the page you want to capture a screenshot of.

    Tap on the top-right 3-dotted menu then tap Share.

    The Android 14 system share menu appears and you have the Print option but also Long screenshot.

    Take Long Screenshot Google Chrome Android 14
    Take Long Screenshot Google Chrome Android 14

    A long screenshot view will show and you can adjust how much to include in the screenshot.

    Long Screenshot Capture with Mobile Chrome on Android 14
    Long Screenshot Capture with Mobile Chrome on Android 14

    Tap the check button for done and you see the image generated ready to save, share or delete to start from the beginning.

    Chrome Save as PDF on Android 14

    To print to PDF choose Print and same as on Firefox Mobile, you choose the printer Save as PDF and paper size.

    Then save the PDF document ready to open or print if needed.

    Chrome Full Size Screenshot on Desktop

    How to take a screenshot of the whole page in Chrome Desktop browser.

    Firefox is much easier but you can also take screenshots of the whole page including scroll on Chrome too.

    These are the steps for the Chrome Browser on Desktop

    Control Shift i – opens the developer options.

    Chrome Open Developer Tools F12 Window
    Chrome Open Developer Tools F12 Window

    Control Shift p – opens the run command screen.

    Type screenshot and the list is filtered based on commands related to screenshot.

    Chrome Capture Full Size Screenshot Menu
    Chrome Capture Full Size Screenshot Menu

    See the option Capture full size screenshot is there.

    Mozilla Firefox Save Full Page Screenshot 1
    Mozilla Firefox Save Full Page Screenshot

    Click the Screenshot button next to the full size screenshot and Chrome will save a PNG file with all the page areas including scrolling areas that are out of view.

    Easy peasy too but with extra steps.

    Hope this helps you!

    Comment below if it was easy peasy or not.

  • Salt Bank Alternativa Revolut in Romania

    Salt Bank Alternativa Revolut in Romania

    Salt Bank, Alternativa Revolut in Romania de la Banca Transilvania. Numele Salt Bank BT sau Salt BT identifica mai ușor de unde e serviciul dar poate e mai bine, simplu Salt Bank.

    UAA95D este codul meu de recomandare de la Salt Bank.

    Instalează aplicația Salt Bank si folosește codul UAA95D pentru înscriere. Grabeste-te.

    Update 15 Aprilie 2024

    La Salt cursul valutar e mai bun decât la Revolut.

    Oricine poate verifica – compara oricând schimbul valutar

    Video Salt Bank Romania card comparație curs valutar Salt vs Revolut. Adauga bani direct in Euro cu transfer bancar din străinătate in contul Euro Salt Bank.

    Salt Bank Romania Card Curs Valutar Adauga Bani Direct in Euro

    Update 18.04.2024 Programul pentru Fondatori s-a încheiat cand Salt Bank a ajuns la 100k utilizatori dar in continuare primesti cardul Salt Bank Mastercard care are cursul valutar foarte bun si multicurrency la fel cum are si cardul Mastercard Platinum. Noile carduri Salt Bank au 2 culori diferite acum dar este foarte posibil sa introducă si alte culori sau ediții limitate sau chiar carduri personalitate.

    Au acum 2 tipuri de card standard care si ele au cursul valutar bun.

    Au si alte produse inclusiv dobânzi bune la Spaces si Depozite.

    Felicitari celor care s-au înscris si au primit cartul Salt Bank Membru Fondator. Au trecut de 100k utlilizatori.

    Primii 100k utilizatori au primit cardul Salt Bank Mastercard Platinum!

    Update 08 Aprilie 2024

    Cardul fizic se livrează prin FAN Curier si primiti mesaj de la FAN Curier cu AWB-ul pentru pachetul de la curier. Se livreaza personal si dureaza doar cateva zile chiar 1-2 zile.

    Este posibil sa folosești cardul virtual de la Salt Bank fara sa folosești cardul fizic.

    Cardul fizic se activeaza odata primit la orice bancomat cu o tranzacție de activare.

    Cardul in pachet postat pe Reddit cu mențiunea ca este card din plastic nu metal dar este într-adevăr card Mastercard Platinum cu toate beneficiile MC Platinum incluse.

    Calitatea imaginii este mai slabă. Cardul in realitate arata asa cum un card Platinum trebuie sa arate – Premium. Era bine daca ar fi de metal dar in general folosim Apple Pay,Google Pay sau chiar Samsung Pay.

    Datele de autentificare ale cardului sunt mereu conținute in Chip-ul EMV sau pentru plati la POS NFC.

    Card Mastercard Platinum Salt Bank Platinum Close up
    Card Mastercard Platinum Salt Bank Platinum Close up Sursa: Reddit.com/r/SaltBankRO/

    UAA95D este codul meu de recomandare de la Salt Bank.

    Instalează aplicația Salt Bank si folosește codul UAA95D pentru înscriere. Grabeste-te.

    Discutia a continuat despre card si desi unii utilizatori sunt dezamagiti ca nu este card de metal, beneficiile MC Platinum sunt foarte atractive.

    Banda magnetica e dezactivata din aplicatie de la emiterea cardului dar poate fi re-activata temporar.

    Pachetul cardului fizic Salt Bank Founder Account Mastercard Platinum este foarte interesant cu glisare când se deschide pachetul.

    Card Mastercard Platinum Salt Bank Platinum Pachet
    Card Mastercard Platinum Salt Bank Platinum Pachet. Sursa: Reddit.com/r/SaltBankRO/

    UAA95D este codul meu de recomandare de la Salt Bank.

    Instalează aplicația Salt Bank si folosește codul UAA95D pentru înscriere. Grabeste-te.

    Update 02 Aprilie 2024

    Aplicatia Salt Bank BT Surpriza Curs Salt vs Revolut Curs Valutar RON-EUR la schimb Revolut vs Salt.

    Nu e de mirare ca atunci cand cauti pe Google Salt Bank, încep sa apara reclame la Revolut.

    Concurenta e foarte buna pentru noi consumatorii cred eu dar si pentru banci ca raman competitive.

    Am mai incercat sa fac o plata prin Google Wallet si cardul Salt Bank cred ca in weekend.
    Am reușit sa ma loghez dupa reinstalat aplicatia.
    Inca nu merge pentru mine in Google pay – EUR in Cipru.
    Le-am trimis mail.
    In acest video arat cum merge aplicatia, cum adaug conturi in USD, GBP si comparatie surpriza intre curs RON-EUR Revolut vs Salt.

    Am Cardul Salt Bank Romania Membru Fondator Mastercard Platinum si abia aștept sa ii fac proba in lounge la aeroport.

    Aplicatia Salt Bank Euro Surpriza Curs Salt vs Revolut Curs Valutar RON-EUR
    Video: Gata! Am Primit Cardul Salt Bank Romania

    Am cardul Salt Bank si mi-am creat cont pe https://www.priceless.com/

    Totul ok cardul Mastercard Platinum Verificat!

    Astept sa am ocazia sa folosesc lounge-ul din aeroport!

    In lista Locations nu am vazut Romania deci cred ca nu merge in Romania sau nu e actualizat. Dar sunt multe locatii pentru lounge!

    Link despre regulamentul Mastercard pentru accesul in Lounge – aeroport Otopeni.

    https://www.mastercard.ro/ro-ro/consumatori/oferte-si-promotii/mastercard-business-lounge.html

    Update Vineri 22 Martie 2024

    Notificare in aplicația Salt Bank primita Vineri 22 Martie 2024 la ora 18:18:

    Vestea pe care o așteptai
    Începând de săptămâna viitoare, intrăm în Early Access mode. Ține notificările pornite.

    UAA95D este codul meu de recomandare de la Salt Bank.

    Instalează aplicația Salt Bank si folosește codul UAA95D pentru înscriere. Grabeste-te.

    Update 29.03.2024 Gata! am cardul si cont RON + EUR

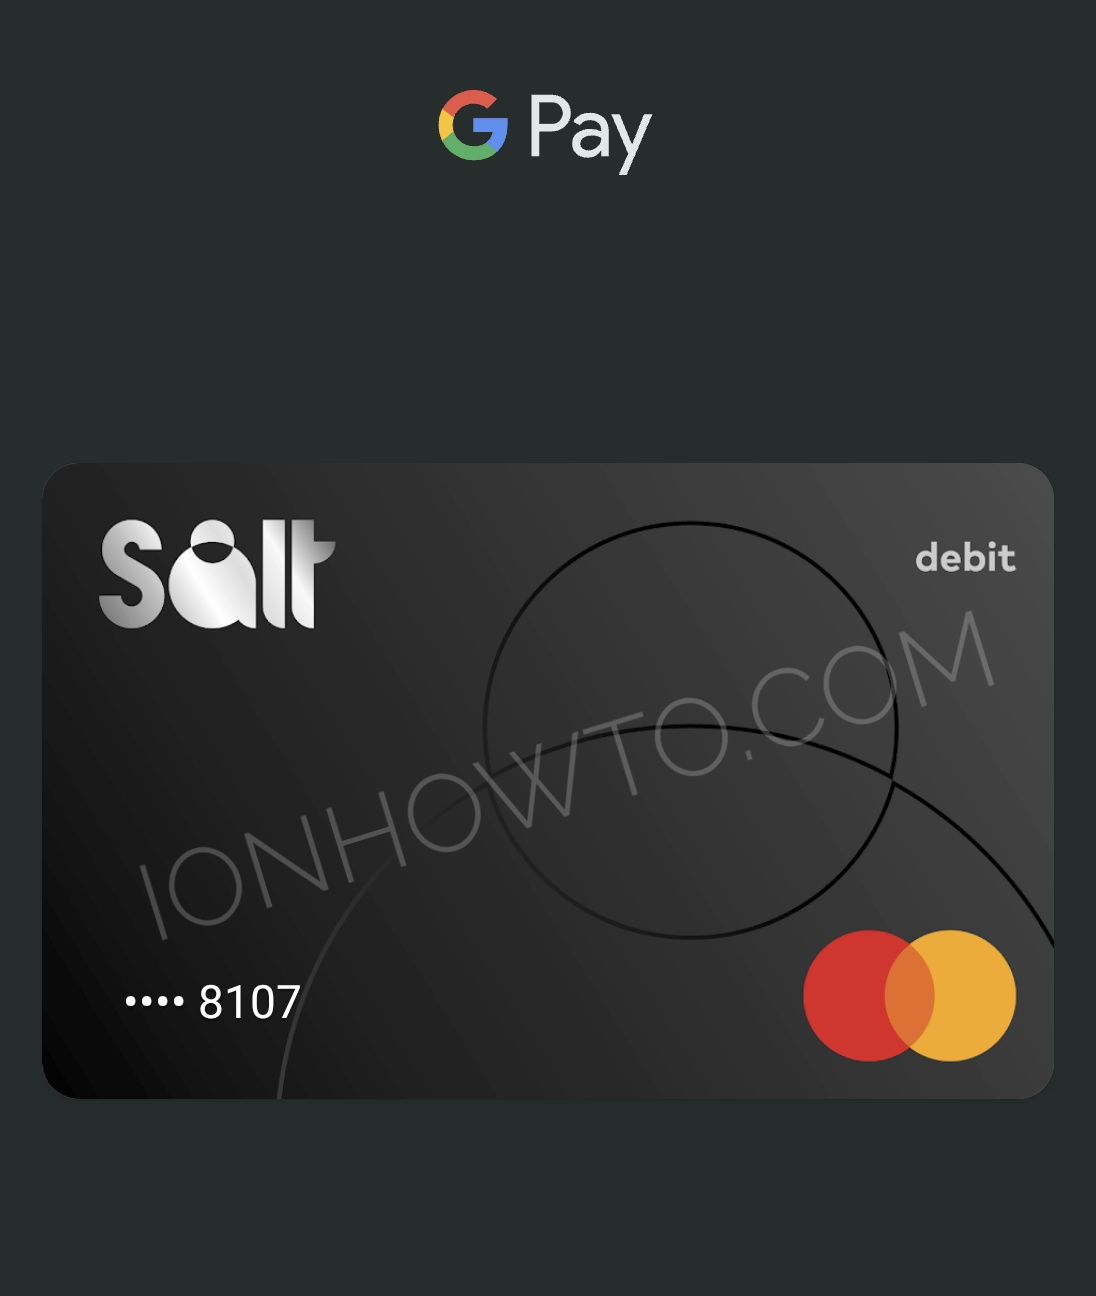
    Card Mastercard Salt Bank Early Access Fondator adaugat in Google Wallet
    Card Mastercard Salt Bank Early Access Fondator adaugat in Google Wallet

    Au schimbat codul de referral dar link-ul ramane la fel.

    Inainte aveam codul 222211 super interesant, acum am codul UAA95D

    Am primit si eu notificare sa deschid contul meu la Salt bank! Yey

    Deschis cont ron + euro, comadat card, adaugat 100 lei din revolut, schimbat in euro.

    Adaugat in Google Pay, Wallet.

    Urmează sa platesc in euro sa vad daca iau comision pentru euro.

    Multicurrency am lasat dezactivat pt. ca scria acolo ceva ca ia din contul lei..

    Later… 

    Am incercat in timp ce multicurrency era dezactivat sa plateac in Euro la POS fizic cu Google Pay dar a dat declined – banned.

    Am activat multicurrency si incerc din nou

    Sa vedem.

    Pana acum 0 comisioane si cardul e fizic commandat dar se activeaza in aplicatie.

    Voi incerca din nou sa platesc in străinătate la pos in euro cu multi-currency activat.

    Cardul e platinum se pare dar eu in Cipru nu pot sa platesc la pos cu RON+EUR si multi currency enabled. Pe terminal apare banned not approved cu google pay si dau swipe sa folosesc Revolut care merge. Poate ca trebuie sa mai astept sau sa fac o transactie in România intai…. O sa incerc la alt procesator.

    E interesant ca optiunea era dezactivata chiar dupa ce am deschis cont in EUR si am schimbat RON to EUR.

    Poate o notificare m-ar fi ajutat dar aplicatia e early preview asa ca poate cand incerci tu,e deja mai usor.

    Mai tarziu am facut update la aplicatia Salt Bank si de atunci nu mai merge deloc. Am vazut pe Reddit ca nu sunt singurul cu problema asta asa am rasuflat usurat ca nu e o problema speciala cu contul meu sau telefonul meu.

    Le-am trimis email despre eroare si cum nu am reusit nici macar 1 plata in EUR in Cipru la Pos unde orice card merge. Poate e nevoie sa fac 1 tranzacție in Romania întâi… nu stiu.
    Am reusit sa incarc 100 lei de pe cardul meu Revolut in contul Lei la Salt Bank.

    E interesant ca nu pot incarca direct Euro pe Salt Bank ci numai Lei si pe urma convertesc in Euro in aplicatie.
    Nu-mi dau seama daca e o problemă de la aplicatie sau asa funcționează din cauza vreunei restricții.

    Dupa update – Device integrity cannot be verified…

    Dupa ce totul functiona in aplicatie…
    M-am gandit sa fac update.
    Dupa imi da eroarea device integrity cannot ve verified.

    Telefon Sony Xperia 1V Android 14
    ultimul update facut si la os si la play store…. Toate aplicațiile Revolut & friends functioneaza.

    Nu am instalat aplicatii intre timp.
    Doar update la Salt Bank.

    Daca pot sa trimit mai multe detalii va rog sa-mi spuneti.

    Am reinstalat dar degeaba. Eroarea ramane si nu pot decat sa inchid aplicatia.
    Sper sa reusiti sa faceti concurență buna pentru Revolut ca ceilalți sunt deja in urma.

    Eu sunt in Cipru acum si am cardul virtual in telefon adaugat la Google Pay / Wallet.

    Am încercat sa fac plati de 3 ori si aparea banned declined sau contact ceva dar mereu declined.

    Despre Salt Bank

    Despre Salt Bank si ce asteptari am eu de la asta. Cu Starling ar avea sanse de succes.

    Azi m-am înscris in coada de așteptare pentru a avea cont la Salt Bank.

    Pentru abonații din Romania! Salt Bank Link

    Avem un Revolut Romanesc nou sper…

    Salt Bank Alternativa Revolut in Romania de la Banca Transilvania

    UAA95D este codul meu de recomandare de la Salt Bank.

    Instalează aplicația Salt Bank si folosește codul UAA95D pentru înscriere. Grabeste-te.

    Sunt destule beneficii declarate in viitor pentru cei care se inscriu devreme.

    Ei zic membrii fondatori Salt Bank dar eu zic useri cu beneficii prin referirea cunoscutilor.

    Din ce declara SaltBank in aplicatie, principalele beneficii pentru membri care se inscriu acum sunt:

    Card Mastercard Platinum

    Asigurare Medicala pentru tine si familia ta, ma gândesc ca e vorba de asigurare de calatorie.

    Nu sunt sigur dar se pare ca este inclus access la Executive / vip lounge in Aeroport la Otopeni si posibil si in afara.

    Video nu este sponsorizat, nu m-a platit nimeni sa fac acest video.

    Am pus codul meu de afiliat ca sa va inscrieti si voi daca e interesant.

    Eu folosesc Revolut exclusiv pentru conversii valutare si ma gandeam ca ar trebui sa avem o alternativă.

    Concurenta e foarte buna pentru noi, consumatorii.

    Numele e destul de amuzant pentru mine SaltBank sau Soft Bank asa cum mereu imi vine sa zic.

    Acum 14 Martie 2024, aplicatia este disponibila si te poti inscrie in programul de ‘membri fondatori’ si cand e gata ne anunta Soft Bank aka Salt Bank printr-un email.

    Sa vedem ce o fi.

    Eu sper din tot sufletul sa mearga bine si cel mai important sa fie super competitiv cu Revolut ca altfel e fass.

    O sa fac un update când am mai multe informații haha!

  • Check Car Tyre Pressure When Weather Gets Cold

    Check Car Tyre Pressure When Weather Gets Cold

    Check car tyre pressure when the weather gets cold.
    When the summer is finished and the cold weather starts, check and fill your tyres with air.

    Check car tyre pressure when the weather gets cold

    In hot weather the air inside the tyres expands and had a normal tyre pressure.
    As the temperature outside cools down, the air inside the tyres contracts and this reduces the pressure in your tyres.

    Make a habbit to refill your tyres with air at least once a month and especially when the weather changes from hot to cold.

    Modern cars have pressure sensors inside the tyres so it’s much easier to know when you should refill the tyres with air or ask someone to fill tour tyres with air.

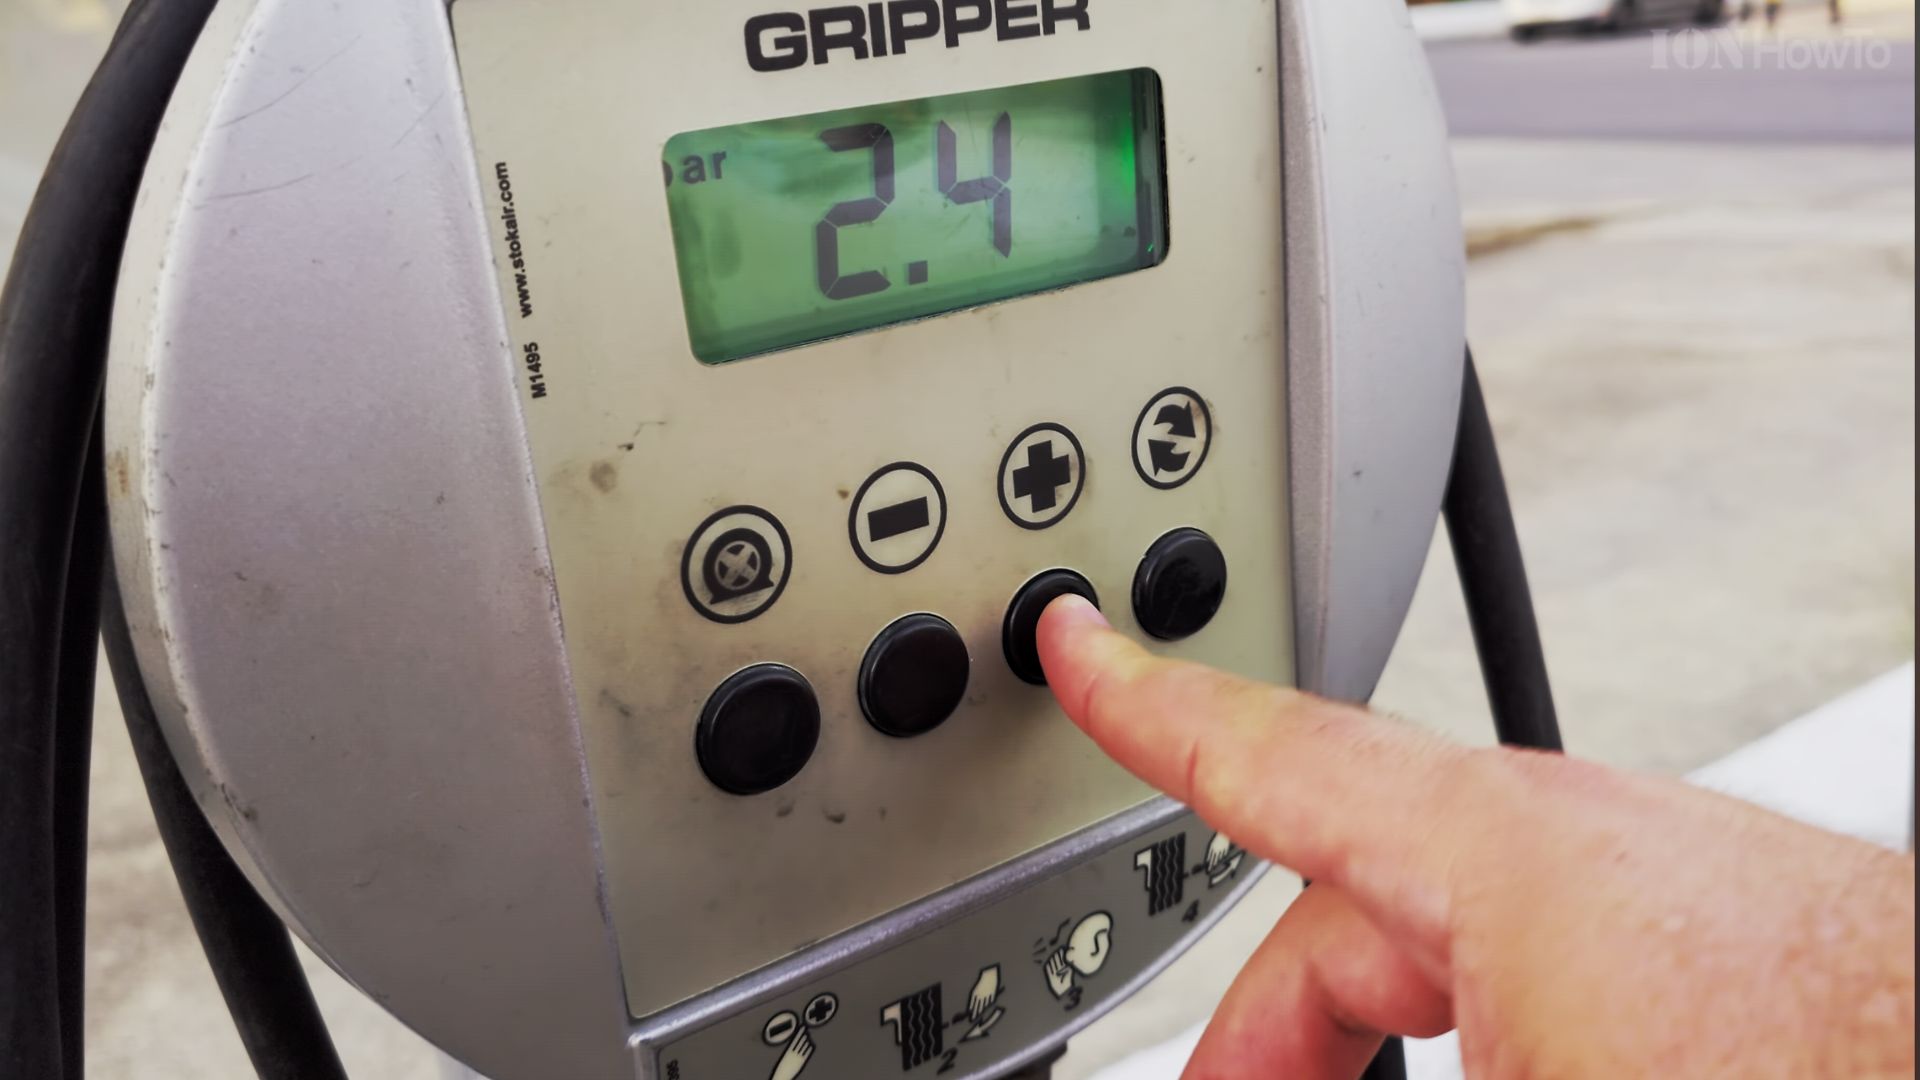
    The tyre air station and your local gas station usually works very well and it even beeps after the pressure is correct.

    The actual pressure you set depends on your car, tyre specifications and load on the car.
    I set my tyre pressure to 2.4 bar or 35 psi on the front wheels and 2.0 bar or 29 psi on the back wheels.

    I used to fill with air pressure of 2.2 bar on the front and 1.9 on the back but a bit more pressure feels like the car drives better.

    When the tyres are inflated properly, the car engine uses less fuel for the same distance and soft tyres make the car harder to move.

  • PC Upgrade RTX 3090 850W GPU Corsair RM850x

    PC Upgrade RTX 3090 850W GPU Corsair RM850x

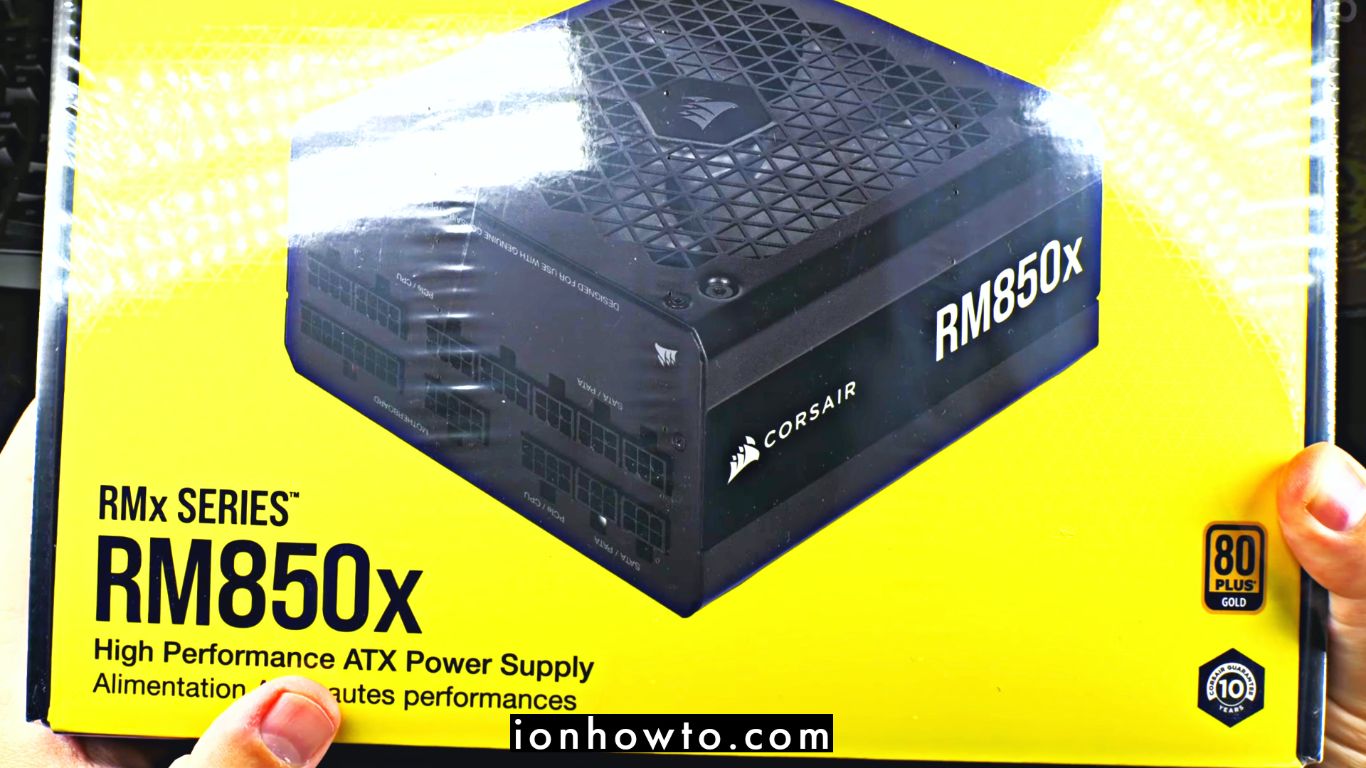
    PC Upgrade RTX 3090 850W GPU Corsair RM850x PSU. 850W PSU will be enough for GPU Asus ROG Strix RTX 3090 OC 25G.

    Corsair RM850X Unboxing

    Corsair RM850X Unboxing and close look at the Corsair RM850X specifications and cables included.

    Corsair RM850X Unboxing

    I bought the RM850X to upgrade from Seasonic Prime 650W PSU to 850W PSU.
    Waiting for a new graphics card GPU Asus ROG Strix RTX 3090 OC 25G.

    My exising Seasonic Power supply might have worked if I could use 2 or 3 separate PCIe cables but I would have to under-volt the GPU a lot to keep the power consumption low and even then, the 650W Power supply might not work.

    Unboxing the Corsair RM850X I discovered that the PSU came with 2 PCIe cables and 3 CPU cables.
    It would have been a lot more useful if it had 3 PCIe cables.

    I did a bit of research and 2 separate PCIe cables are fine. Using 2 PCIe sockets on the PSU and connecting to RTX 3090 with 3 PCIe 12v power sockets.
    I will use one PCIe 12v cable standalone and the second one daisy-chained to be able to use all 3 12V power sockets on the RTX 3090 GPU.
    The PCI 5.0 Power adapters for the 600W+ single connector uses 2 PSU sockets also. If you look for it, you will see Corsair sells the Type 5 cable set with the PCIe 5 connector taking power from 2 PSU sockets not 3.

    The Corsair RM850X had a strong lacquer or power components glue smell that was very strong and it smelled in the room for 2-3 days while in use. Eventually the smell faded away.
    Keep your windows open the first 2-3 days you use this PSU. It smells bad but some people like this power transformer lacquer components smell.

    The Corsair RM850X is larger than my old PSU Seasonic Prime Gold 650W.
    The case dimensions are the same to be compatible with ATX cases but it’s a few centimeters longer.

    Installed it and it’s working perfectly

    Corsair RM850X installation

    For now I have my existing Asus Dual OC 6G RTX 2060 installed in the PC and my RTX 2060 only needs one PCIe 12V power cable.
    I routed the other 2 power cables already waiting patiently next to the gpu for the time to install the new RTX 3090 in there.

    Like this, all cables are ready and it will be a quick GPU swap when ready.

    I upgraded the PSU also to make sure that I reduce the chances of the RTX 3090 not working and I didn’t want to do the PSU and GPU upgrade together to make sure the PSU works with the existing GPU before upgrading the GPU too.

    Doing it in steps to avoid doing too many changes at once in case a component is faulty.

    Corsair PCIe Type 4 extra cable

    Corsair PCIe Type 4 extra cable installation

    PCIe cables are ready to go, PSU works fine with the existing setup. Ready for the Asus ROG Strix OC RTX 3090 24G GPU.

  • Sony Xperia 1 V Drop Test

    Sony Xperia 1 V Drop Test

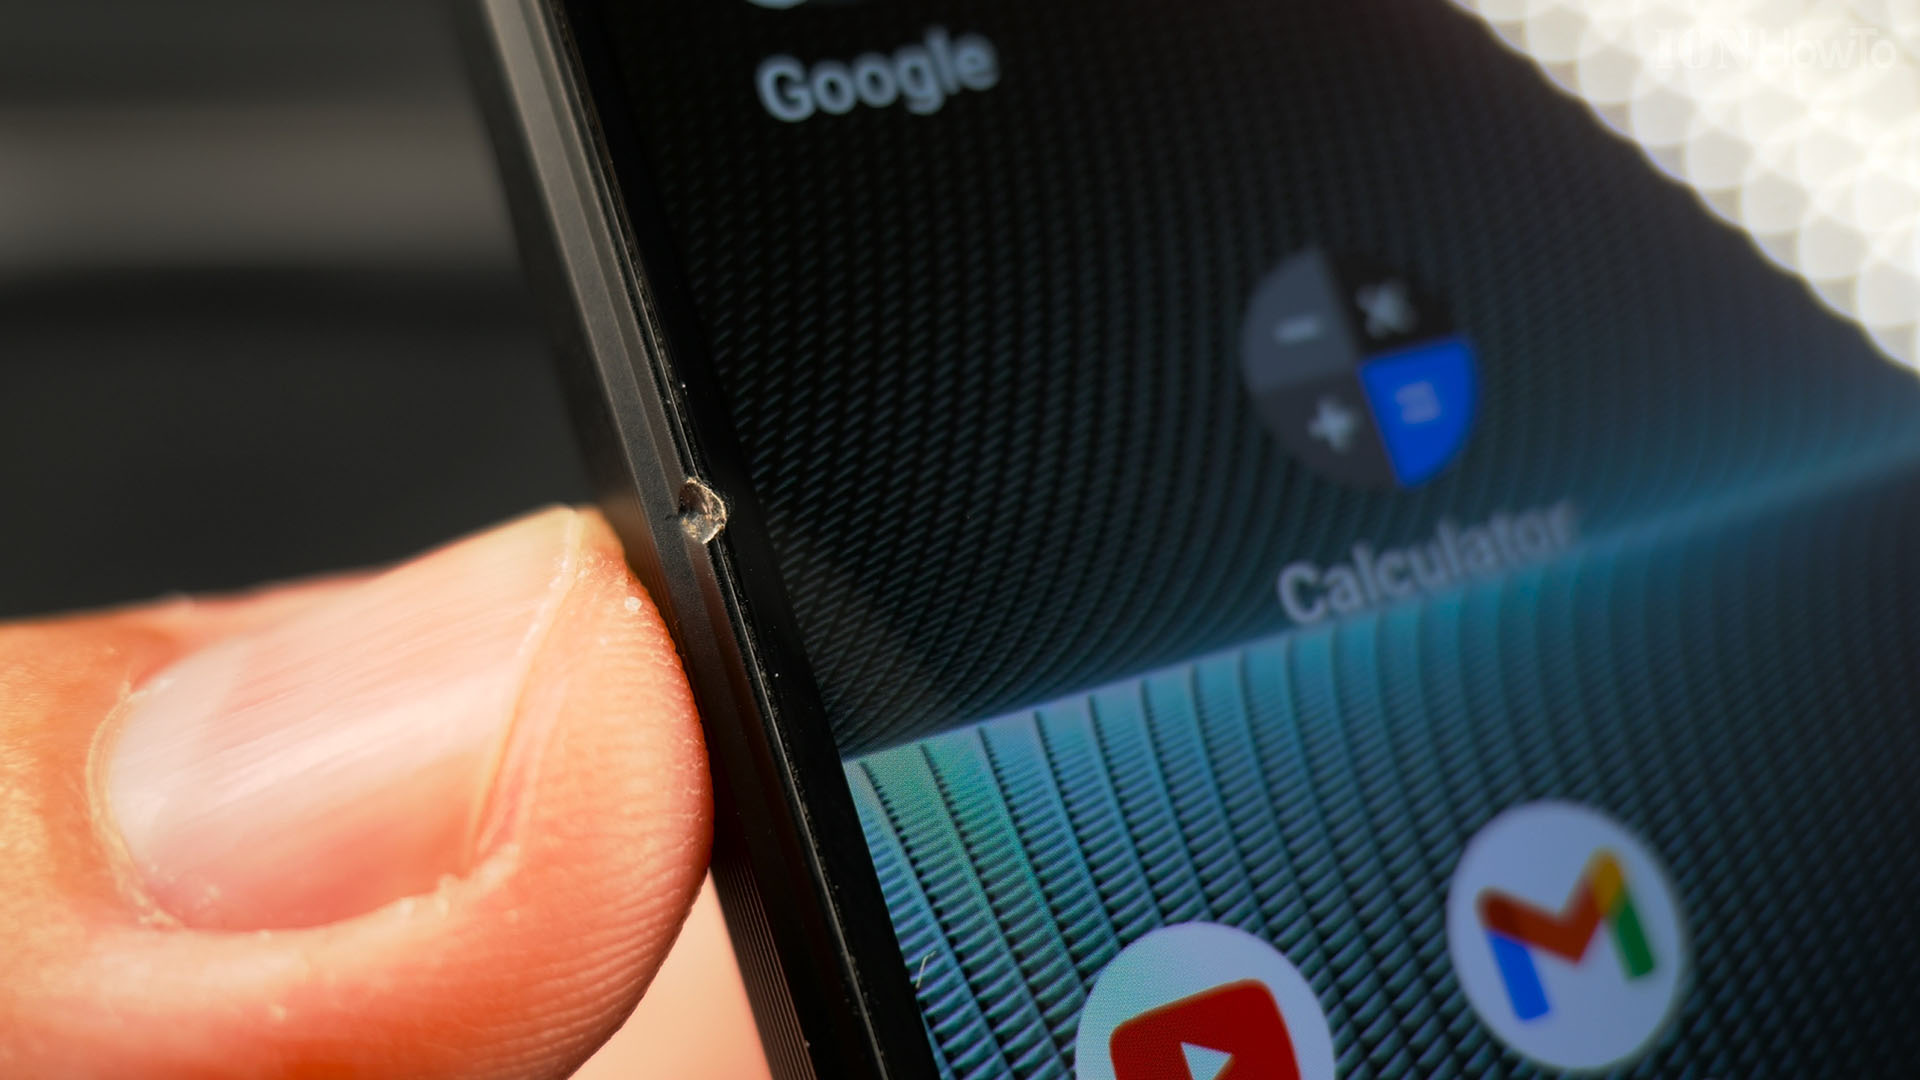
    Sony Xperia 1 V Drop Tested by accident coming out of the car, the phone came out of my pocket and hit the car frame then the concrete cement pavelemt really hard.

    Sony Xperia 1 V XQ-DQ54 EU model.
    Today I did a drop test of Sony Xperia 1 V by mistake.

    Amazon:
    Sony Xperia 1 V https://rex.red/sony-xperia-1-v
    Case for Xperia 1 V https://rex.red/sony-xperia-1-v-case
    Screen protector for Xperia 1 V https://rex.red/sony-xperia-1-v-screen-protector
    Sony WH-1000XM5 https://rex.red/sony-wh-1000xm5

    Xperia 1 V drop tested dents and scratches

    I had the phone in my front pocket in the car and as I opened the car door to come out of the car, my beloved Xperia 1 V slides out of my pocket and hits the car frame in multiple places for it to eventually hit the hard concrete pavement with many small and large rocks coming out of the cement concrete floor.

    My precious Sony Xperia 1 V was sliding on the cement concrete pavement face down / screen down on the concrete like it was sliding on ice. I was really worried the screen was cracked or some major dents happened and I have a dent on the side of the phone 1mm away from the 4k display.
    I was really lucky the display doesn’t appear to be damaged in any way.

    The dent is made in the frame of the Xperia 1V and it can be polished away with a pencil eraser or my nail but best is to leave it as it is and get a case and a screen protector asap.

    Case and screen protector are a must. At least get a case for it, any case is better than aluminum frame hitting cement and getting dents so close to the display.

    I use it and test it for about a week now already and there are some good things and bad things about the Sony Xperia 1 V phone.

    Overall this phone is a work of art hardware and software.
    Will make some video tests and comparisons with the S23 Ultra in HDR video and photo.

    I wish it was just a bit wider but not as wide as the S23 ultra.
    Any info you are curious about or tests you want to see ask.

    Sony Xperia 1 V Specifications:
    Manufacturer: SONY
    Model: XQ-DQ54
    ROM: 256GB
    RAM: 12GB
    Color: Black
    EAN Barcode: 4589771648728
    Sony Xperia 1 V EU model XQ-DQ54
    SKU: XQDQ54C0B.EUK

  • Sony Xperia 1 V Review

    Sony Xperia 1 V Review

    Sony Xperia 1 V Review of XQ-DQ54 EU model.

    Starting with the conclusion.

    Should you buy it? Yes but…

    Why but? The Sony Xperia 1 V is not a simple to use phone mainly because of the camera apps and the unusual 21:9 aspect ratio of the display.

    You need the best phone that can do everything? Have a look at Samsung Galaxy S23 Ultra.

    You want to feel special and you’re willing to sacrifice some convenience for the wow effect? Also, if you are a content creator the Sony Xperia 1 V Camera pro and Video pro apps give you many really useful features. The Cinema app is there for I don’t know who. My opinion is that Video Pro app should do 21:9 video recording too and leave the Cinema Pro app for the specialized uses.

    Overheating sometimes

    The Xperia 1V overheated after 3 minutes of 4k30p video recording on one day with +33 no wind celsius.

    Today I did a video comparison between Sony Xperia 1V and Samsung S23 Ultra. Recorded 4k60p on Xperia without any thermal shutdown like I had before.

    Today was 31 celsius with strong wind at the sea so that’s probably all the Xperia 1V needs to keep going – strong air flow.

    Noticed the image quality on the Xperia 1V very close to my Panasonic Limix S5 and colors were true to real life.

    I tried to use the stylus from s23 ultra on the Xperia 1 V. I had low hopes but it didn’t work at all on the Xperia 1V.

    Ideally we will have a Samsung Xperia like Ultra without the narrow screen of Xperia or less wide that the S23 Ultra.

    Samsung S24 Ultra Xperia 1 VI Wishlist

    Wishlist for Samsung and Sony on their next phone:

    • Display of Xperia 4K BT.2020 Don’t care about LTPO.
    • Front facing Stereo speakers of Xperia 1V.
    • Stylus that works the same as the S-Pen.
    • The next Xperia can be more heavy but keep it under 200 grams for the bare phone.
    • Don’t care about 3.5mm jack – it’s nice but usbc adapters are ok especially the Apple adapter. It’s really useful to have 3.5 mm headphones jack for listening to music while charging.
    • Don’t care about a SLOW microsd slot reader.
    • Give options for 512GB and 1TB and people will buy what they need.

    Sony Xperia 1 V Review

    Sony Xperia 1 V Review of XQ-DQ54 EU model

    Happy preorder pickup day

    I use it and test it for about a week now already and there are some good things and bad things about the Sony Xperia 1 V phone.

    Preorder bundle overview
    Unboxing

    Xperia 1 V biggest features are the bt.2020 HDR display, amazing front facing speakers and camera like photos and video.

    But watch out it tends to overheat.
    Was recording a review vlog and the thing overheated on me.

    Photos are less phone-like and more camera-like which is amazing for a device to carry in your pocket.

    Videos especially hdr hlg are amazing on all lenses and especially on the 24mm lens.
    You have 4k 120 for those splashes at the beach.

    You will feel less like a sheep that follows the herd and more like a confused sheep who paid a lot of money for a phone with a narrow but beautiful screen that is overheating more than you imagined.

    Bravia Core for Xperia

    Bravia Core, can’t have everything I guess.

    Bravia Core Xperia app is not available in the country I live in. I live in EU but after a * disclaimer and a Europe2 list that only show the countries list after you hover it.
    Bravia Core all available in EU was a white lie covered by terms and conditions after seeing the marketing photo with the preorder offer invluding Bravia Core. It doesn’t support Cyprus, tough luck.

    I talked to sony support and they sent me a link that says the app is not available in my country – Cyprus.
    They sell it as having bravia core 12 months subscription but can’t install the app.
    Did they forget Cyprus is actually in the EU?

    This is the app link they sent me:
    https://play.google.com/store/apps/details?id=com.sonypicturescore.xperia

    What would you like to know about it?
    Typing it from its juicy Android keyboard.

    Amazon

    Sony Xperia 1 V https://rex.red/sony-xperia-1-v *
    Case for Xperia 1 V https://rex.red/sony-xperia-1-v-case-gb *
    Screen protector for Xperia 1 V https://rex.red/sony-xperia-1-v-screen-protector *
    Sony WH-1000XM5  https://rex.red/sony-wh-1000xm5 *

    A few things so far I noticed:
    4K 60 gets hot fast but no temp warning so far in normal use.
    Also gets hot just from watching YouTube. I suspect it’s the Real time HDR drive setting and Creator mode causing the overheating.

    I didn’t enable 120hz constant refresh rate or audio processing.

    Audio

    I tried Dolby sound and DSSE ultimate but made no audible difference to me do I turned them both off.

    Display

    Best is to use Creator mode and 120hz high refresh rate but I prefer to keep constant 120hz setting off.

    Sony Xperia 1 V Display Settings

    The display on the Xperia is simply amazing.

    Cameras

    All 3 cameras can record 4k 120fps video. Yes they can.

    Watch the camera comparison chapters


    16mm ultrawide looks good but 24mm looks amazing and for portraits try the 85-125mm equivalent lens.
    Seamless zoom can switch automatically between lenses but not at 60fps or 120fps

    Camera apps

    The Photo pro app in basic mode, can record both photos and videos just like a regular phone camera app.

    The camera pro app in P mode can record RAW dng files that average in size to 20-25mb per photo.
    To compare .jpg files are about 2.5-3mb each.

    Video pro app is for advanced users with meters settings and so many useful things that might actually get in the way to recording. This app is not for your average clips.
    It can record bt.709, S-Cinetone for mobile and HLG HDR.

    For me the video app is set to always 4K HDR and between 60 and 30fps, seamless zoom or 24, 85 -125mm.

    Cinema pro app is really beautiful and can record in wide screen 21:9 but it has so many annoying things that I wouldn’t touch that unless I must use ultrawide.

    Initial setup

    Initial setup restore from Google One Backup went very smoothly.

    Sony Xperia 1 V First Start Setup

    Transferred from my old Xiaomi all settings and apps are surprisingly easy but Xperia 1 V became very hot while doing it.
    Even had the cameras disabled for high temp and only got fixed after a restart.

    Sony Xperia 1 V vs Samsung Galaxy S23 Ultra

    Overall this phone is a work of art hardware and software.
    I recorded some video tests and comparisons with the S23 Ultra in HDR video and photo.

    Sony Xperia 1 V vs Samsung Galaxy S23 Ultra

    I wish it was just a bit wider but not as wide as the S23 ultra.
    Any info you are curious about or tests you want to see ask.

    Sony Xperia 1 V Specifications:
    Manufacturer: SONY
    Model: XQ-DQ54
    ROM: 256GB
    RAM: 12GB
    Color: Black
    EAN Barcode: 4589771648728
    Sony Xperia 1 V EU model XQ-DQ54
    SKU: XQDQ54C0B.EUK

    Battery care

    Best battery care settings to use on Sony Xperia 1 V for battery optimizations and extending the battery live of the Xperia 1 V.
    Sony Xperia 1 V EU model charging settings overview and best settings to consider enabling.

    Xperia 1V battery care settings


    Charging information after the first charge on the Xperia 1 V.

    Software updates

    Sony Xperia 1 V is supposed to receive 2 major Android updates. Or 2 years of software updates and longer security updates but nobody really knows for sure.

    Xperia 1 V ships with Android 13 Android API 33 so we should expect to have Android 14 on Sony Xperia 1 V and then Android 15 before Xperia 1V is abandoned in the software update pit of endless wait for updates abd darkness (huh poetic stuff here).

    Best part about the updates is that the have interesting illustrations – check details on them. Also system updates take a long time.

    System update

    Sony Xperia 1 V Software Update 67.0.A.4.22 installation and steps taking a long time to complete.
    You should start a software system update with at least 50% battery.
    This shows what to expect when updating the Sony Xperia 1 V system to update 67.0.A.4.22.

    Xperia system update details:
    Update Xperia system from build number:
    67.0.A.1.127
    Update to build number:
    67.0.A.4.22
    Size 416.8 MB

    Conclusion

    Conclusion or is it worth the money?

    We bought both Samsung Galaxy S23 Ultra and Sony Xperia 1V with our money. Videos and this post are not sponsored and show real life use.

    Would I exchange my Sony Xperia 1 V for Samsung Galaxy S23 Ultra? No. I like a light phone and even if I really enjoy the S23 Ultra S-pen, it’s too wide and heavy for me.

    I am starting to get used to the Xperia 1 V 21:9 narrow screen and I use wired headphones on it every day just like in the old days when all phones had a 3.5mm headphone jack!

    I don’t use the MicroSD card yet but I might grab a 1tb Sandisk Extreme to have extra storage. Watch out for the slow read /write speed on the Xperia 1 V MicroSD There are some reports of limited speed of as low as 30 MB/S

    Samsung Galaxy S23 Ultra is an amazing productivity and media + browsing phone.

    Sony Xperia 1 V is the cool content creator’s phone that is like a tool ready to use any moment instead of running for the camera. External monitor mode only works if your camera is Sony thru USB-C, not my case so I don’t care about that.

    Also the external monitor thing is a bit of a gimmick.

    As a content creator, the best thing about switching from filming with a phone to using a camera is that my phone is free and not with a dead battery when I finish a video.

    Sony WH-1000XM5

    Sony WH-1000XM5 unboxing. Sony WH-1000XM5 unboxing from Sony Xperia 1 V preorder bundle.

    Sony WH-1000XM5 unboxing

    If you like this, say so in the comments. If you don’t write a comment and let us know too.

    What would you like to know about it?
    A few things so far I noticed so far.

    Sony WH-1000XM5 comfort

    Sony WH-1000XM5 comfort test and noise cancelling tests.
    Sony WH-1000XM5 from Sony Xperia 1 V preorder bundle.

    Sony WH-1000XM5 comfort

    The good:
    Made for Apple iPhone and iPod, supports Alexa built-in and Google assistant.
    Hi-Res Audio
    LDAC Bluetooth audio
    Wired 3.5mm audio jack connection option and USB-C universal charging port.
    Amazing noise cancelling effect. If feels like you are instantly moved to a quiet room as soon as you put the headphones on as long as the power is on. Even if the music is stopped.
    Talk feature when you can cover your right headphone and ambient-aware / talk-thru functions plays in the headphones the sound from outside.
    Eco-friendly packing and great carrying case. Zipping the case closed feels like preparing for a trip on a plane.
    Any Noise cancelling headphones and especially the Sony WH-1000XM5 are a must have for frequent flyers.

    The bad:
    A bit bulky and can feel hot in the summer.
    Complicated storage system headphones do not fold and can take more space in some situations.

    Included in the package:
    Sony WH-1000XM5
    Carrying case with zipper made of cloth and strong plastic hard structure.
    Charging cable USB-A to USB-C very short – you might need to buy another cable.
    Headphones cable 3.5mm jack to 3.5mm jack. TRS not TRRS so no wired microphone function.
    Papers, warranty cards, quick-start guide and disclaimers.

    Sony WH-1000XM5 specifications:
    Manufacturer: SONY
    Model: WH-1000XM5 WH-1000XM5/BM
    Code model YY2954
    Color: Black
    EAN Barcode: 4548736132580
    Sony WH-1000XM5 CE7

    Update 14 August 2023:

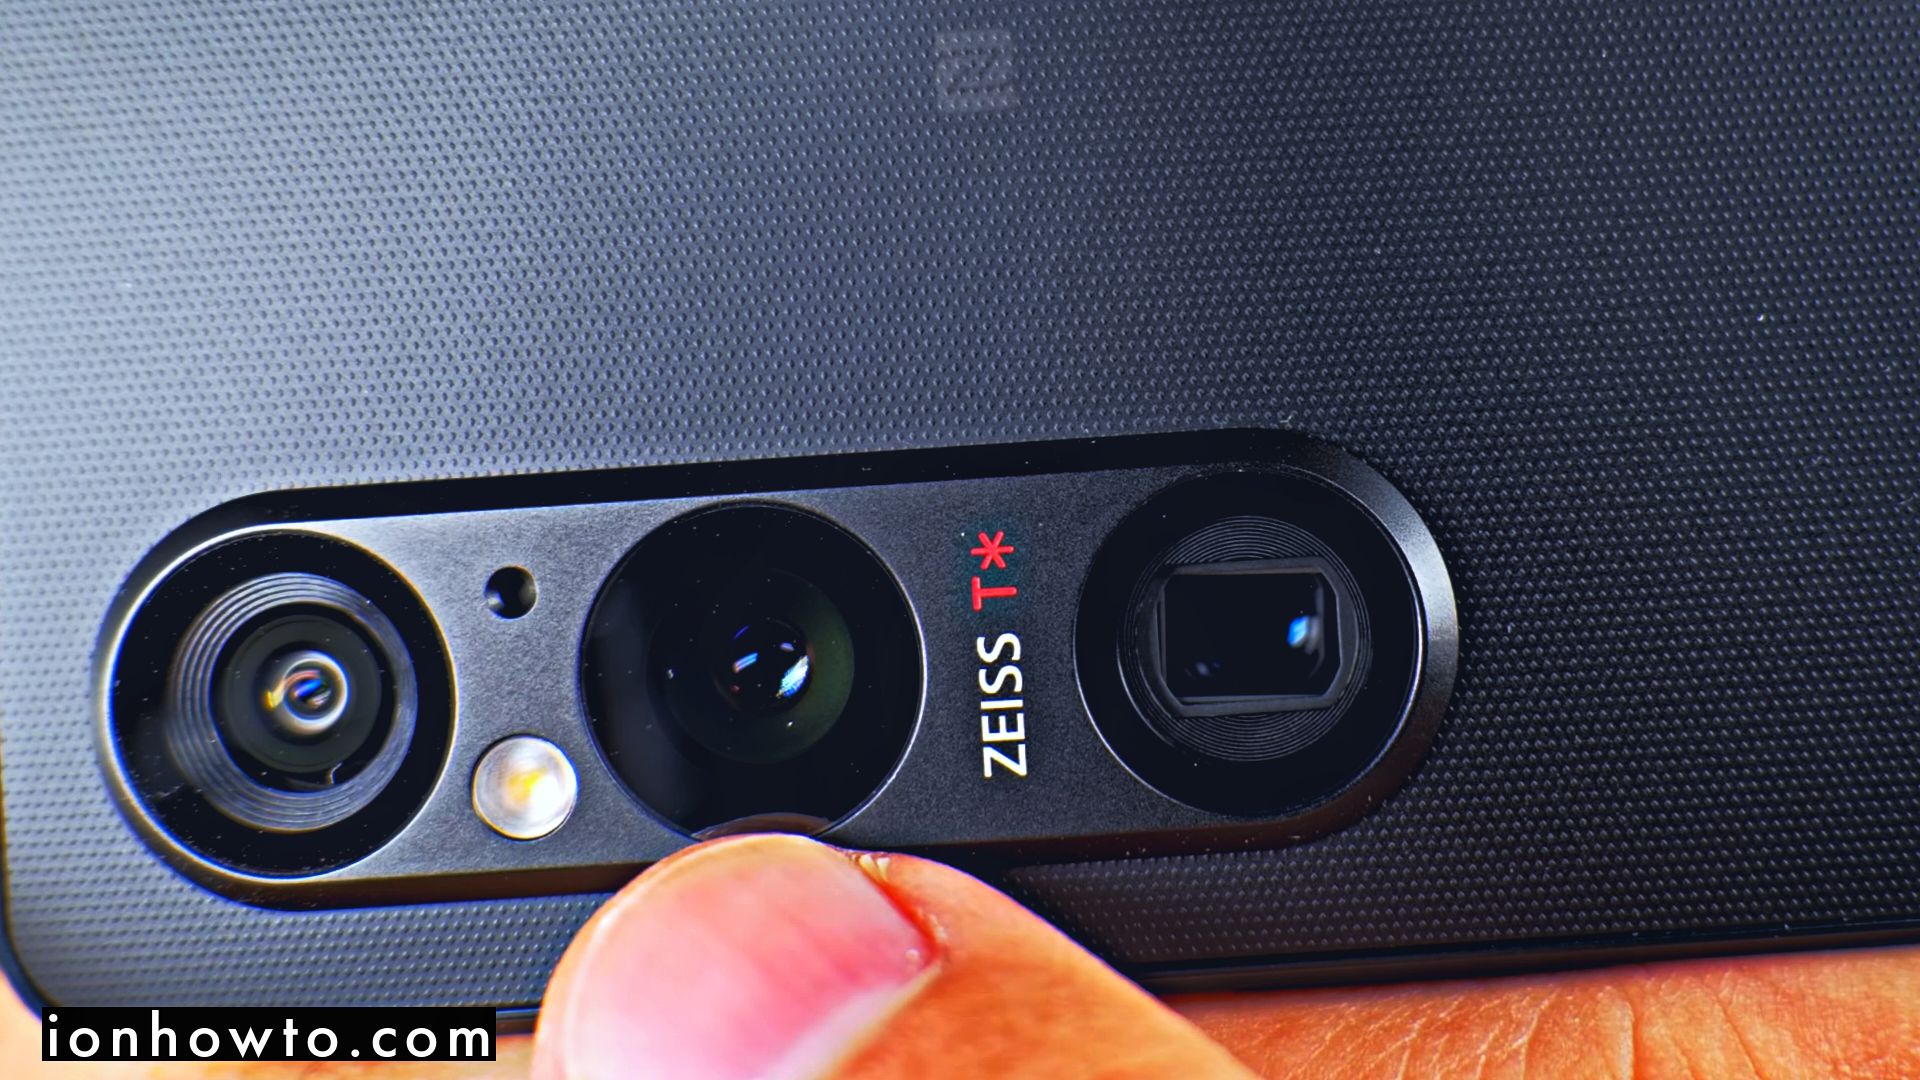
    Sony Xperia 1 V Camera Lenses Rattle Moving Noise Stabilizer Test

    Sony Xperia 1 V camera lenses rattle moving noise and image stabilizer noise

    Sony Xperia 1 V camera lenses rattle moving noise and image stabilizer noise.

    Sony Xperia 1V Camera lenses moving noise when starting the camera app or video pro app.
    Sony Xperia 1V camera noise Stabilizer Zoom on off.
    Sony Xperia 1 V makes a strange noise when the camera turns on and while the cameras are in use it makes a strange buzzing noise that changes while zooming.
    Also there is noise when the image stabilization compensates for movements.
    The lenses of the Sony Xperia 1 V are loose inside and make a rattling noise when shaking the phone while the cameras are turned off.
    Once the cameras are started and the magnetic field of the image stabilization is working, the lenses rattle noise should not happen.

    I placed microphones close to the Sony Xperia 1 V to hear the various noises made my the cameras.

    I’m not sure if this is all normal.
    I believe it it normal but let me know in the comments bellow what you think. Is it normal or no?
    You noticed something different?

    Xperia 1 V OIS buzzing noise fixed

    Later update 2023.12.07, I was able to fix the ois noise on my Xperia 1 V.

    Sony Xperia 1 V Camera Humm Buzzing Noise in Video Recording Fixed

    I compared the stereo left and right  microphones on the Sony Xperia 1 V to hear the various noises made my the cameras.

    Testes the Xperia 1 V with the Spigen case and without any case.

    The ois buzzing noise is in the left audio channel when recording stereo and it’s much louder when the phone is in the case.

    Modified the Spigen case to reduce Xperia ois lens noise during video pro app recording.

    I’m not sure if this is all normal. It’s probably a problem with all the Xperia 1V phones or Xperia phones in general.
    Let me know in the comments bellow what you think. Is it normal or no?
    You noticed something different?

    If only Sony placed the microphone closer to the headphone jack or in the middle of the phone similar to how the Right channel microphone is next to the usb-c charging port.

    Adding the foam on the corner really made all the difference eventually. it sounded like without the case.
    Noise was still there sometimes but at the level of when not using the case.

    I will setup a rig with a phone mount and hook and loop to attach to the phone an external stereo microphone thru a usb audio interface for much better audio quality similar to how the camera audio was during the tests.
    can’t carry that all the time but the case mod and the option for external stereo is ok for me.

    Did you try this fix and did it work for you?
    Let me know in the comments section below here or on the video comments.


  • How to fold a T-Shirt in 2 seconds

    How to fold a T-Shirt in 2 seconds

    How to fold a T-Shirt in under 2 seconds.

    How to fold a T-Shirt in 2 Seconds

    Fold a shirt in 2 seconds with the Japanese Quick Fold pinching method.

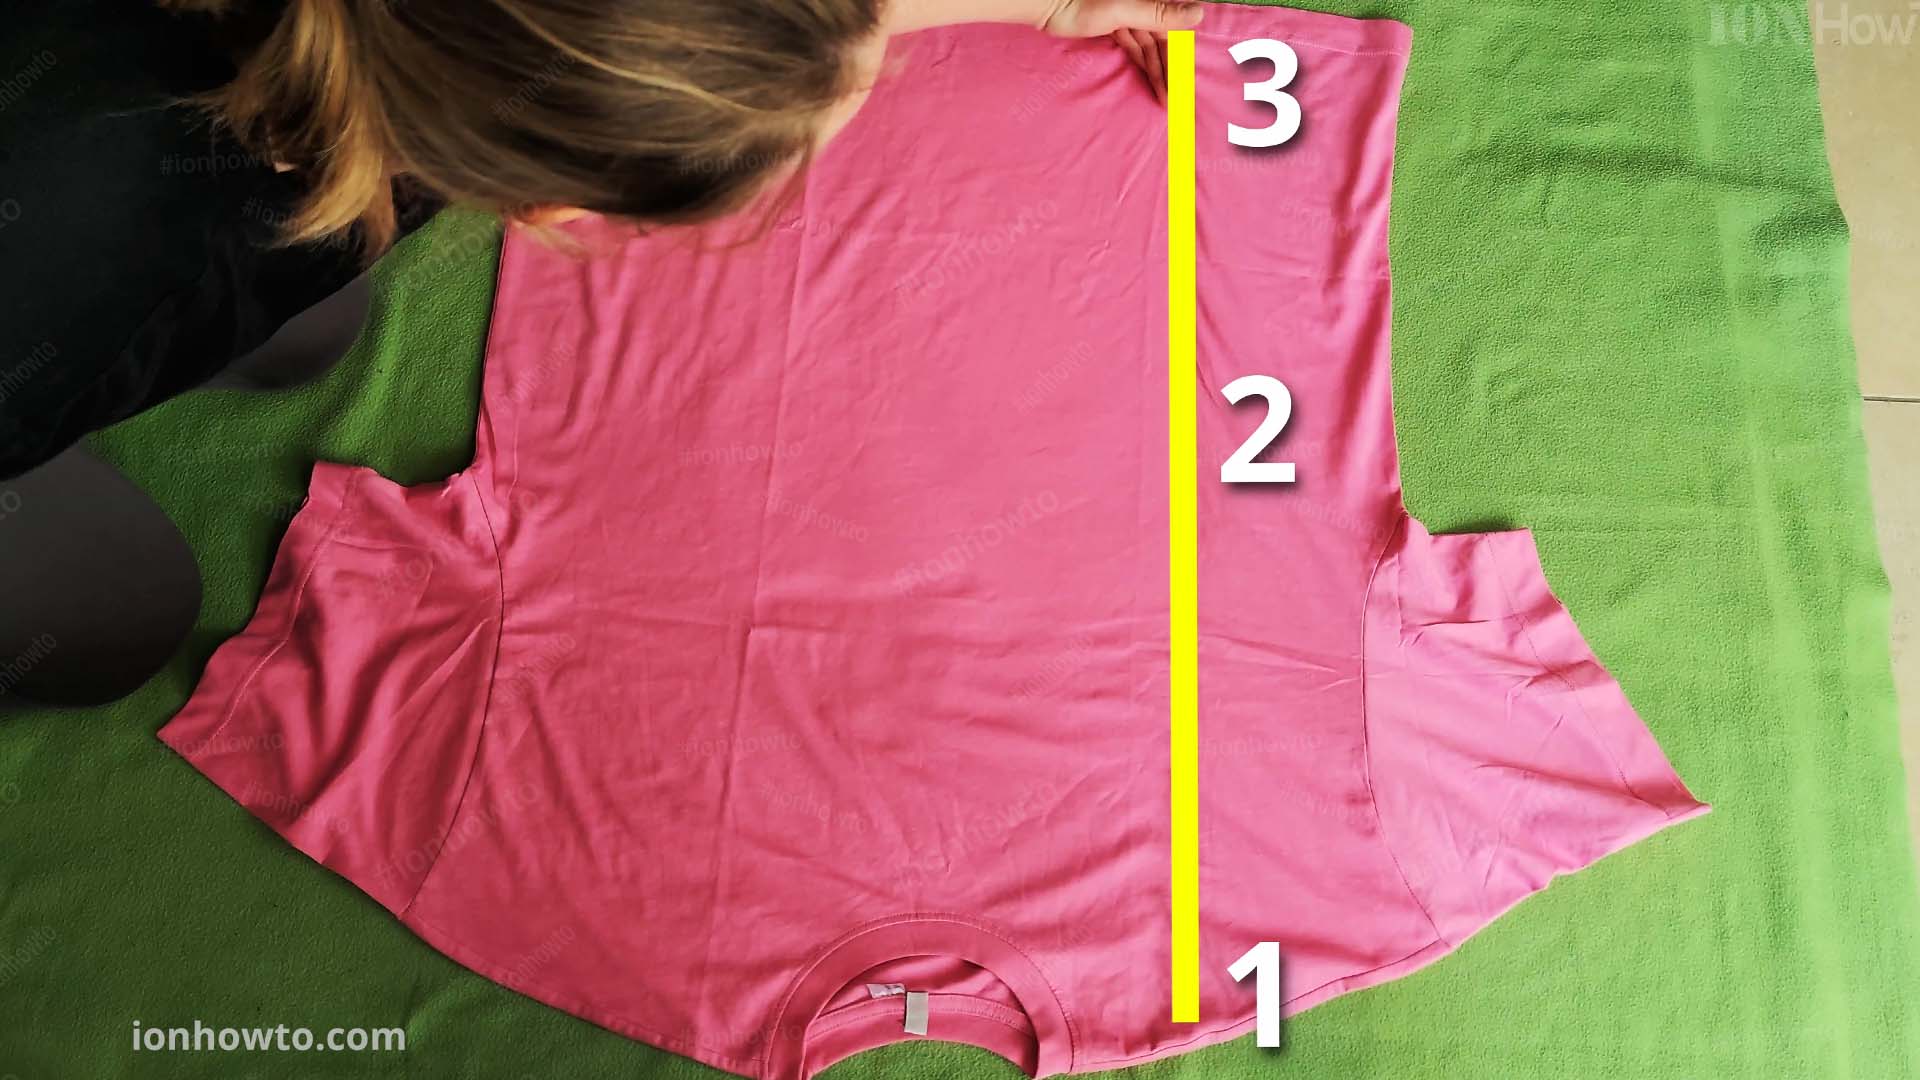
    You draw 2 imaginary lines on the T-shirt or shirt to help you visualize how to pinch the shirt and fold a shirt in under 2 seconds.

    Step 1 Draw vertical imaginary line Fold a T shirt
    Step 1 Draw vertical imaginary line Fold a T shirt

    There are 3 points on the vertical T-shirt line at the start, middle where it intersects the horizontal line and at the lower part of the T-shirt.

    Step 2 Draw Horizontal imaginary line Fold a T shirt
    Step 2 Draw Horizontal imaginary line Fold a T shirt
    • Point 1 is at the top next to the T-shirt neck.
    • Point 2 is in the middle at the intersection with the horizontal line.
    • Point 3 is at the bottom of the T-shirt on the vertical line.

    Method to fold a T-shirt in under 2 seconds

    How to fold a T-shirt in under 2 seconds steps.

    Pinch point 1 with your right hand as seen int he video.

    Step 3 Pinch Points 1 and 2 Fold a T shirt
    Step 3 Pinch Points 1 and 2 Fold a T shirt

    Pinch point 2 while holding point 1.

    Crossing your arms, keep holding both 1 and 2 and bring point 1 to point 3.

    Step 4 Bring point 1 towards 3 and hold 1 and 3 Fold a T shirt
    Step 4 Bring point 1 towards 3 and hold 1 and 3 Fold a T shirt

    Holding points 1 and 3 in your right arm and 2 in your left arm, uncross your arms.

    Step 5 Fold the T shirt under itself Fold a T shirt
    Step 5 Fold the T shirt under itself Fold a T shirt

    Pinch point 3 together with point 1.

    Fold the T-shirt under itself on the table and you have folded a shirt or T-shirt professionally in under 2 seconds.

    Fold the T shirt in half under itself again Fold a T shirt
    Fold the T shirt in half under itself again Fold a T shirt

    If it takes you 5 seconds or 5 minutes at first, you will get used to it and folding t-shirts in 2 seconds after a few tries.

    Professionally folded T shirt
    Professionally folded T shirt

    Enjoy!