
USB-C Hub Teardown: What’s Inside a Generic Hub?
Ever wondered what makes your USB-C hub tick? Maybe it’s started acting up, or you’re just curious about the tiny computer that lets you plug in all your devices. I cracked open a generic “Nod” brand USB 3.1 hub to find out. The heart of this little device is a chip you’ve probably never heard of: the Genesys Logic GL3523. Using its official datasheet as my guide, I’ll show you what this chip does and walk you through the steps of taking one of these hubs apart and putting it back together.
Meet the Brain: The Genesys Logic GL3523 Chip
Before we grab the screwdriver, let’s understand the main component. The GL3523 is a powerful little hub controller that manages all the traffic flowing through your USB ports.
Here’s what makes it special, according to its technical specs:
- It’s a True Multi-Speed Hub: It’s compliant with the USB 3.1 Gen 1 standard (also known as USB 3.0). This means it seamlessly handles super-fast SuperSpeed (5 Gbps) devices, older High-Speed (USB 2.0), and even very old Full-Speed (USB 1.1) gadgets all at once.
- Built for Charging: This chip isn’t just for data. It has native fast-charging support. It can fast-charge Apple and Samsung Galaxy devices and complies with the common USB Battery Charging (BC1.2) standard, allowing devices to draw more power.
- Smarter Power Management: It has built-in regulators that turn the 5V from your computer into the different voltages the chip needs. It also supports advanced power-saving states to be more efficient.
- Optional USB-C Features: The “GL3523-S” version of this chip, which was likely in my hub, has native USB Type-C support. This means it handles the flip-able plug, configures power delivery, and can manage different USB-C current modes.
Tools You’ll Need for the Teardown
Taking apart a USB hub is usually straightforward. You’ll only need a few basic tools:
- A set of small Phillips-head screwdrivers (size #00 or #0 is perfect).
- A plastic prying tool or an old guitar pick. This is crucial for prying open plastic clips without scratching or breaking the case.
- A pair of tweezers for handling small connectors or screws.
- A clean, well-lit workspace with a small container to keep screws from getting lost.
Step-by-Step: Disassembling Your USB-C Hub
Now, let’s get inside. I’ll show you how to take apart a generic hub like the “Nod” model.
Step 1: Remove the Visible Screws
Start by flipping the hub over. Look for any rubber feet on the bottom—they often hide screws. Peel them back carefully. Remove all the screws you find with your small Phillips-head screwdriver.
Step 2: Pry Open the Case
With the screws out, the case is usually held together by plastic clips. Take your plastic prying tool and gently work your way around the seam between the top and bottom halves of the hub. Apply steady, gentle pressure. You should hear soft clicks as the clips release. Don’t force it; if it’s not budging, check for a screw you might have missed.
Step 3: Identify the Main Components
Once open, you’ll see the internal Printed Circuit Board (PCB). Here’s what you’re looking at:
- The Hub Controller (GL3523): This is the largest chip on the board, likely marked with “GL3523” or “GL3523-S”. It’s the brain we talked about.
- The Crystal Oscillator: Look for a small, silver, metal-can component near the main chip. This is the 25 MHz clock mentioned in the datasheet; it keeps everything running in sync.
- The SPI Flash Memory: A small, 8-pin chip (often near the GL3523). This holds the hub’s firmware, which allows for custom settings and future updates.
- Port Controllers & Power Regulation: You’ll see smaller chips or groups of components around each USB port. These manage power delivery and data lines for each individual port.
- LED Indicators: Tiny LEDs and their current-limiting resistors will be visible, connected to light up the activity lights on the hub’s case.
What Can You Actually Fix? A Realistic Look
Opening the hub is the easy part. The hard truth is that most internal failures aren’t user-repairable. Here’s what you can and can’t do:
You can possibly fix:
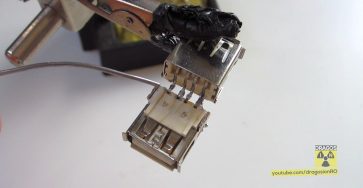
- A Loose USB Port: If a physical port is wobbly or detached, you might be able to re-solder it to the PCB with very fine soldering skills.
- A Broken Case Clip: Super glue can sometimes repair a broken plastic clip if you’re careful.
You likely cannot fix:
- A Failed GL3523 Chip: If the main hub controller is dead, the hub is toast. Replacing this tiny, complex chip requires specialized equipment.
- Internal PCB Damage: If the circuit board itself is cracked or has burned traces, it’s not economically repairable.
- Firmware Corruption: While the chip supports firmware upgrades via the SPI flash, you generally can’t get the proprietary firmware files from the manufacturer.
Step-by-Step: Reassembling Your Hub
If you’re just exploring or managed a simple fix, putting it back together is simple.
- Carefully place the PCB back into the bottom half of the case, ensuring it sits flat and all the USB ports align correctly with their holes.
- Snap the top half of the case back on. Start by aligning the clips on one side and gently press around the edges until you hear all the clips click into place.
- Replace all the screws. Make sure they are snug but don’t overtighten them, as you can easily strip the threads in the plastic.
- Re-attach any rubber feet you removed.
Final Thoughts: Is It Worth It?
Teardowns like this are fantastic for satisfying curiosity and learning how your everyday tech works. You’ve now seen that even a generic “Nod” hub contains a sophisticated little system-on-a-chip like the Genesys Logic GL3523, managing power, data, and charging protocols.
However, for actual repairs, the economics are harsh. Given the low cost of most generic hubs, the time and specialized skill needed to fix a faulty chip or deep electrical issue almost always outweighs just buying a new one. But as a learning project? It’s absolutely worth the time. Now you know exactly what’s inside that little plastic box on your desk


Leave a Reply