
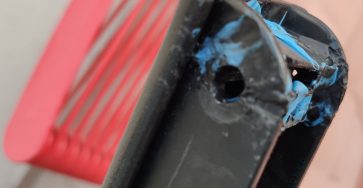
How to fix plastic without glue.
Quick Steps and Scenarios Overview
| What You Need to Do | Quick Jump |
|---|---|
| Or fix it | Jump to Step 1 |
| Welding plastic | Jump to Step 2 |
| Fix many things | Jump to Step 3 |
| Fix things instead of throwing them away | Jump to Step 4 |
| Share your experience | Jump to Step 5 |
| Read or watch more | Jump to Step 6 |
How to do DIY plastic welding. A DIY guide on how to weld many kinds of easily at home with just a cheap soldering iron.
Recently one of our veranda chairs had a broken plastic arm.
In that moment, we could have thrown it away as there would be no spare part for it.
Or fix it
One screw needed to be replaced and that was easier than expected.
Biggest problem was the plastic handle was broken and it was important to have a strong bond if I was to fix it.
Thought about using glue such as Super glue or epoxy but usually in these cases glue just doesn’t work.
Even after leaving it for 2 days to cure, it will break.
Next best thing and the only way to fix it is to weld the plastics.
Welding plastic
When melting plastics, always have a way to get rid of fumes, a fume extractor or doing it outdoors next to a fan.
The soldering iron is used to melt both sides of the cracked plastic then you can use another piece of plastic as filler to make the plastic bond stronger.
Plastic parts nearly aways have the plastic type code written on them. Usually it’s is a hidden place.
Few types of plastic that are easy to weld are:
- PP – Polypropylene
- HDPE – High-density polyethylene
- LDPE – Low-density polyethylene
In my case the arm of the chair is made of PP or Polypropylene.
I used water bottle caps as filler to make the melted plastic joint thicker and more solid.
Let soldering iron and the welded plastic part cool-down to room temperature.
Once cool, the plastic is fixed and ready to use.
No more 24-48 hours waiting for glue to get dry.
Weld plastics, don’t glue them.
Like that it’s harder to break in the future.
Fix many things
Used the exact same DIY hack to fix a standing fan that had a plastic piece broken.
The holder of the fan grill was broken and is now solid in place.
The fan is otherwise a great product but it had this design flaw.
Fix things instead of throwing them away
It would be a real shame to throw away a perfectly working appliance or household item just because a small plastic part is broken and there are no spare parts available.
Share your experience
Write a comment about how you weld plastics and what you have fixed do far.
Read or watch more
Subscribe to my YouTube channel, dragosionRO
Subscribe to our cooking channel on YouTube.
Read our favorite recipes.
Use our Amazon links for purchases to support us.
Have a great day!
Dragos
Helpful Tips
Check all labels, connections, and power ratings before starting so everything fits safely and securely. If any detail looks slightly different on your model, pause the embedded video above for a clear closeup view.
Related Guides
- iPad How to Make App Icons Bigger on Home Screen – If small app icons on your iPad are difficult to see or tap with your fingers, you can make them larger with a single setting.
- iPad How to Show or Hide App Labels on Home Screen – If the text names beneath your iPad icons vanished or you want a cleaner look without titles, you can switch them easily.
- How to Hide and Unhide Apps on iPad Home Screen – If you want a tidy iPad screen without rarely used apps crowding your wallpaper, you can hide them in your App Library.
- DIY & Household Repairs – Browse more tutorials and practical guides in this section.


Leave a Reply